Combien de fois dites-vous « non » à des choses qui pourraient interférer avec vos objectifs ?
Every time we say "no" to a request or an opportunity that doesn’t align with our goals, we’re essentially making room for those that do. This principle is crucial in the fast-evolving tech world. The selection of technologies for our projects should resonate with scalability, or maintainability.
Understanding the Significance of ‘No’ in Professional Growth, Node.js LTS
Node.js, a runtime environment based on Chrome’s V8 JavaScript engine, facilitates the development of fast and scalable network applications. Its Long-Term Support (LTS) versions, offer stability and extended support. This makes Node.js LTS an ideal choice for developers looking to build reliable and maintainable applications.
The Frontend Library for Interactive UIs : React.js
React.js stands out as a declarative, efficient, and flexible JavaScript library for building user interfaces. It enables developers to create large web applications that can change data without reloading the page, promising a smooth user experience.
To run this server, execute node server.js in your terminal,
Frontend: React.js
Now, create a simple React component that fetches and displays these tasks.
File: TasksComponent.js
import React, { useState, useEffect } from 'react';

function TasksComponent() {
  const [tasks, setTasks] = useState([]);

  // Fetch tasks from the backend on component mount
  useEffect(() => {
    fetch('http://localhost:3001/api/tasks')
      .then(response => response.json())
      .then(data => setTasks(data))
      .catch(error => console.error('Error fetching tasks:', error));
  }, []); // Empty dependency array means this effect runs once on mount

  return (
    <div>
      <h2>Tasks List</h2>
      <ul>
        {tasks.map(task => (
          <li key={task.id}>
            {task.title} - {task.completed ? 'Done' : 'Pending'}
          </li>
        ))}
      </ul>
    </div>
  );
}

export default TasksComponent;
To integrate this component into a React application, you would include it in your app’s component tree, usually in the App.js file. Make sure your React app is running on a different port (the default create-react-app port is 3000) to avoid conflicts with the backend server.
Running the Full-Stack App
Start the backend server (node server.js).
Run the React frontend app (typically with npm start or yarn start in the create-react-app scaffold).
DOM Schema with Emoji 🌐 ➡️ 📝
Consider a simple DOM schema representing a web app structure:
🌐 Root: The entry point of the application.
📝 Component 1: A functional component for handling user inputs.
📄 Component 2: A class component for displaying data fetched from the Node.js server.
Conclusion
Fetching Data with React.js and Displaying It
// A simple React function to fetch data from a Node.js backend
async function fetchData() {
  const response = await fetch('http://your-node-server.com/api/data');
  const data = await response.json();
  console.log(data);
}
Saying "no" to technologies that don’t align with our goals allows us to focus on tools that do, like the powerful combination of Node.js LTS and React.js. This approach not only aids in achieving our project objectives but also in realizing our broader goal of becoming a successful developer.
Quel est le meilleur compliment que vous ayez reçu ?
Styling in React with SCSS
SCSS, or Sassy CSS, offers a more dynamic and powerful approach to styling in conjunction with React, it allows for modular and reusable style sheets that can enhance the visual hierarchy and aesthetics of web applications.
Import these styles directly into your React components : Use node-sass or dart-sass in your React project to compile SCSS files into CSS.
React Router plays a pivotal role in developing single-page applications () by managing the navigation between different views without refreshing the page.
Usage: Define routes using <Route> components within a <Router> to map paths to components.
Maintaining a React application involves regular dependency updates, code refactoring for performance optimization, and adherence to best practices such as code splitting and the judicious use of PureComponent keeps your application scalable and maintainable.
Dependencies in React projects are managed through package.json. Keeping these dependencies up to date is crucial for security, performance, and accessing new features.
A simple npm command to update all your project’s dependencies to their latest versions :
Refactoring your React code can significantly impact performance, especially for large and complex applications. This could involve breaking down large components into smaller, more manageable ones, optimizing re-renders with React.memo or useMemo, and ensuring that components only update when necessary.
Code splitting is a technique that allows you to split your code into smaller chunks which you then load on demand. React supports code splitting via dynamic import().
Example: Using dynamic import() for Code Splittingimport React, { Suspense, lazy } from 'react'; const OtherComponent = lazy(() => import('./OtherComponent')); function MyComponent() { return ( <div> <Suspense fallback={<div>Loading...</div>}> <OtherComponent /> </Suspense> </div> ); }
PureComponent is useful for optimizing class components that re-render frequently. It implements shouldComponentUpdate with a shallow prop and state comparison. This means the component only updates if there’s a change in props or state, preventing unnecessary updates.
Example: Using PureComponentimport React, { PureComponent } from 'react'; class MyComponent extends PureComponent { render() { return <div>{this.props.myProp}</div>; } }
React’s declarative nature contrasts with the imperative approach seen in traditional algorithms. An algorithm in React might involve setting state based on user input or API responses, showcasing React’s reactive paradigm.
Algorithm Example: Dynamic List Rendering in App.js
import React, { useState, useEffect } from ‘react’;
function App() {
const [items, setItems] = useState([]);
useEffect(() => {
// Imagine fetching data from an API here
setItems([{ id: 1, text: ‘Learn React’ }, { id: 2, text: ‘Build Projects’ }]);
}, []);
Transitioning from the technical to the personal, the finest compliment I’ve ever received was about my ability to simplify complex concepts, making them accessible to others. This feedback, beyond its immediate warmth, underscored the importance of clear communication in education and knowledge sharing. It’s a principle that guides both my teaching and writing, especially in articles like this one.
To illustrate an improved version of a React App.js file for a pizza-related application, let’s craft a functional component that showcases a simple pizza menu. This component will import necessary React features, display a list of pizzas, and include a basic interaction to select a pizza. We’ll also touch on organizing this into a scalable structure by importing a hypothetical PizzaMenu component.
Step 1: Set Up Your Project
Ensure you have a React environment set up. If you’re starting from scratch, the easiest way is to use Create React App:npx create-react-app pizza-app cd pizza-app
Step 2: Install Necessary Packages
While this example may not require additional packages, remember that real-world applications might need libraries such as react-router-dom for routing or sass for SCSS styling.
Step 3: Define the PizzaMenu Component
Before we dive into App.js, let’s assume you have a PizzaMenu component in a separate file (PizzaMenu.js). This component could look something like this:
This App.js demonstrates a clean, functional approach to building a React application. It imports a PizzaMenu component, uses hooks for state management, and handles user interactions in a straightforward manner.
Hooks are a feature introduced in React 16.8 that allow you to use state and other React features without writing a class. They enable functional components to have access to stateful logic and lifecycle features that were previously only possible with class components. Hooks provide a more direct API to the React concepts you already know: props, state, context, refs, and lifecycle.
Commonly Used React Hooks
useState: This hook allows you to add React state to functional components. When you call it, you receive a pair: the current state value and a function that lets you update it.
const [count, setCount] = useState(0);
useEffect: This hook lets you perform side effects in functional components. It serves the same purpose as componentDidMount, componentDidUpdate, and componentWillUnmount in React classes, unified into a single API.
useEffect(() => { // Code to run on component mount or update return () => { // Cleanup code, similar to componentWillUnmount }; }, [/* dependencies */]);
useContext: This hook allows you to access the value of a React context. It makes it easier to consume the context value in functional components without relying on the Consumer component.
const value = useContext(MyContext);
useReducer: An alternative to useState, ideal for managing state logic that involves multiple sub-values or when the next state depends on the previous one. It also makes transitioning to Redux easier if needed.
useCallback: Returns a memoized callback function. This is useful for passing callbacks to optimized child components that rely on reference equality to prevent unnecessary renders.
useMemo: Returns a memoized value. It only recalculates the memoized value when one of the dependencies has changed. This optimization helps to avoid expensive calculations on every render.
useRef: Returns a mutable ref object whose .current property is initialized to the passed argument. It can be used to store a mutable value that does not cause re-render when updated.
const myRef = useRef(initialValue);
useLayoutEffect: It has the same signature as useEffect, but it fires synchronously after all DOM mutations. Use it to read layout from the DOM and re-render synchronously.
Benefits of Hooks
Simplified Code: Hooks allow you to use more of React’s features without classes, which can make your code cleaner and easier to understand.
Reusability: Custom hooks can encapsulate stateful logic and be shared across components, promoting code reuse.
Composition: Hooks offer a more powerful and flexible way to compose software logic compared to patterns like higher-order components (HOCs) and render props.
By providing a more direct API to React’s features, hooks embrace functional programming principles and significantly simplify component logic, making it more predictable and easier to manage.
In the labyrinthine world of web development, the quest for efficient data binding mechanisms is perpetual. Angular, a champion among web development frameworks, offers a potent spell known as ngModel for binding form elements such as <input>, <select>, or <textarea> to component properties. This syntax, affectionately dubbed the “banana in a box” syntax, combines square brackets [ ] for property binding and parentheses ( ) for event binding, creating a two-way data binding conduit.
<input [(ngModel)]="task.title">
In the example above, task.title is a property of the component class. The [(ngModel)] directive weaves a two-way binding between the <input> element’s value and this property. Thus, as a user inscribes text into the input, task.title in the component updates in real-time, and vice versa.
To harness ngModel, the FormsModule must be imported into your Angular module:
import { FormsModule } from '@angular/forms'; @NgModule({ declarations: [ // Your components ], imports: [ // Other modules, FormsModule ] }) export class YourModule { }
Limitations and Best Practices
While ngModel is a powerful ally for simpler forms, Angular’s Reactive Forms may better suit complex scenarios, offering more control and scalability.
In essence, ngModel equips Angular adventurers with an elegant tool for developing dynamic forms, streamlining the journey from template to functionality.
Object-Oriented PHP (OOP) offers a robust paradigm for developing scalable and maintainable applications. By encapsulating data and behavior into objects and utilizing principles like inheritance and polymorphism, developers can create complex applications with ease. PHP’s support for OOP has matured significantly, allowing for the creation of advanced web applications that are both powerful and efficient.
Namespaces and Composer
Namespaces are essential in PHP for organizing code and avoiding name conflicts, especially in large applications or when using third-party libraries. Composer, the dependency management tool, further enhances PHP’s capabilities by managing libraries and their dependencies, making it easier to maintain and update the codebase.
RESTful APIs with PHP
PHP’s ability to create RESTful APIs opens up the possibility for applications to communicate over the web, sharing data in popular formats like JSON and XML. By adhering to HTTP standards and employing authentication mechanisms such as OAuth or JWT, PHP developers can secure and optimize their API endpoints.
Security Practices
Security is paramount in web development. PHP offers various ways to secure applications, such as using HTTPS, sanitizing user inputs, and implementing hashing algorithms for password storage. By following best practices, developers can protect their applications from common vulnerabilities like SQL injection and XSS attacks.
Testing and Debugging
Testing and debugging are critical for ensuring the reliability of PHP applications. Tools like PHPUnit for unit testing and Xdebug for debugging provide developers with the means to test their code thoroughly and identify bugs efficiently.
CI/CD
Embracing Continuous Integration and Deployment (CI/CD) practices allows for automated testing and deployment, improving the development workflow and reducing the time to market for new features and fixes.
Prepared Statements
<?php

$servername = "localhost";
$username = "username"; // Update with your username
$password = "password"; // Update with your password
$dbname = "musicDB";

try {
    $conn = new PDO("mysql:host=$servername;dbname=$dbname", $username, $password);
    $conn->setAttribute(PDO::ATTR_ERRMODE, PDO::ERRMODE_EXCEPTION);

    $searchNote = 'D4'; // The note we're searching for
    $newFrequency = 294.00; // New frequency or frequency to insert if the note doesn't exist

    // Search for the note in the database
    $stmt = $conn->prepare("SELECT * FROM c_major_scale WHERE note = :note");
    $stmt->execute(['note' => $searchNote]);

    if ($stmt->rowCount() > 0) {
        // Note exists, update its frequency
        $updateStmt = $conn->prepare("UPDATE c_major_scale SET frequency = :frequency WHERE note = :note");
        $updateStmt->execute(['frequency' => $newFrequency, 'note' => $searchNote]);
        echo "Note '$searchNote' updated with new frequency $newFrequency Hz.\n";
    } else {
        // Note doesn't exist, insert new note and frequency
        $insertStmt = $conn->prepare("INSERT INTO c_major_scale (note, frequency) VALUES (:note, :frequency)");
        $insertStmt->execute(['note' => $searchNote, 'frequency' => $newFrequency]);
        echo "Note '$searchNote' inserted with frequency $newFrequency Hz.\n";
    }
} catch(PDOException $e) {
    echo "Error: " . $e->getMessage();
}

$conn = null;

?>
Prepared statements in PHP are crucial for database security and performance. By separating SQL logic from data values, they prevent SQL injection attacks and optimize database interactions. The MySQLi and PDO extensions offer robust support for prepared statements, catering to different database management needs.
Conclusion
Object-Oriented PHP, combined with modern development tools and practices, equips developers with a comprehensive toolkit for building sophisticated web applications. As PHP continues to evolve, leveraging these advanced techniques will ensure your projects are secure, efficient, and scalable.
SCSS, or Sassy CSS, offers a more dynamic approach to styling with variables, mixins, and nested rules, making our task app not just functional but visually cohesive and appealing.
// Define Variables for Theme Consistency
$primary-color: #007BFF; // Primary button color
$hover-color: #0056b3;   // Button hover state color
$task-bg-color: #f4f4f4; // Background color for tasks
$font-color: white;      // Color for text in buttons
$input-width: 70%;       // Width of the input field

// Mixin for Hover Effects
@mixin hover-effect($color) {
    &:hover {
        background-color: $color;
    }
}

// Input and Button Styles
.input-button-container {
    input[type="text"] {
        padding: 10px;
        font-size: 16px;
        width: $input-width;
        margin-right: 10px;

        @media (max-width: 600px) {
            width: 100%;
            margin: 10px 0;
        }
    }

    button {
        padding: 10px 20px;
        background-color: $primary-color;
        color: $font-color;
        border: none;
        cursor: pointer;
        font-size: 16px;

        @include hover-effect($hover-color);
    }
}

// Task List Styles
.task-list {
    list-style: none;
    padding: 0;

    .task {
        background-color: $task-bg-color;
        margin-bottom: 10px;
        padding: 20px;
        border-radius: 5px;
        box-shadow: 0 2px 4px rgba(0,0,0,0.1);
    }
}
This snippet introduces responsiveness and interactivity through mixins and media queries.
Pure CSS provides the backbone for our application’s styling.
Task Input and Button: We’ve increased the padding and font size to enhance user experience, making the elements more clickable and readable. The blue color scheme provides a calming effect and high contrast for readability.
Task List: By decluttering the interface, removing default list styles and padding, we’ve placed the focus squarely on the content. Each task stands out against the app’s background, with visual cues like margins and shadows enhancing the user interface.
Responsive Design: A media query ensures that on smaller screens, inputs and buttons adapt to full width, maintaining usability and accessibility across devices.
Our journey begins with the creation of the Task class, the cornerstone of our application. This class represents the tasks our users will manage:
public class Task {
    private String description;
    private boolean isCompleted;

    public Task(String description) {
        this.description = description;
        this.isCompleted = false;
    }

    public String getDescription() {
        return description;
    }

    public boolean isCompleted() {
        return isCompleted;
    }

    public void completeTask() {
        isCompleted = true;
    }

    @Override
    public String toString() {
        return (isCompleted ? "[X] " : "[ ] ") + description;
    }
}
Step 2: Task Logic
With our Task class defined, we introduce the TaskManager class to encapsulate our application’s logic, including adding, viewing, completing, and deleting tasks:
import java.util.ArrayList;
import java.util.Scanner;

public class TaskManager {
    private ArrayList<Task> tasks = new ArrayList<>();
    private Scanner scanner = new Scanner(System.in);

    public void start() {
        boolean isRunning = true;

        while (isRunning) {
            System.out.println("Task Manager - Choose an action: (1) Add Task (2) View Tasks (3) Complete Task (4) Exit");
            String action = scanner.nextLine();

            switch (action) {
                case "1":
                    addTask();
                    break;
                case "2":
                    viewTasks();
                    break;
                case "3":
                    completeTask();
                    break;
                case "4":
                    isRunning = false;
                    break;
                default:
                    System.out.println("Invalid option. Please choose a valid action.");
            }
        }
    }

    private void addTask() {
        System.out.println("Enter task description:");
        String description = scanner.nextLine();
        tasks.add(new Task(description));
        System.out.println("Task added.");
    }

    private void viewTasks() {
        if (tasks.isEmpty()) {
            System.out.println("No tasks available.");
        } else {
            for (int i = 0; i < tasks.size(); i++) {
                System.out.println((i + 1) + ". " + tasks.get(i));
            }
        }
    }

    private void completeTask() {
        viewTasks();
        System.out.println("Enter the number of the task to complete:");
        int taskNumber = Integer.parseInt(scanner.nextLine());
        if (taskNumber >= 1 && taskNumber <= tasks.size()) {
            tasks.get(taskNumber - 1).completeTask();
            System.out.println("Task completed.");
        } else {
            System.out.println("Invalid task number.");
        }
    }
}
Step 3: Running the Task Manager
To breathe life into our Task Manager, we craft a Main class to serve as the entry point for our application:
public class Main {
    public static void main(String[] args) {
        TaskManager taskManager = new TaskManager();
        taskManager.start();
    }
}
How to Run
Compile the Java Files: Use the javac command in your terminal within the directory containing your .java files.
javac Task.java TaskManager.java Main.java
Run the Application:
java Main
Resources for the Java Adventurer
Oracle’s Java Tutorials: A treasure trove of knowledge covering Java programming from the ground up.
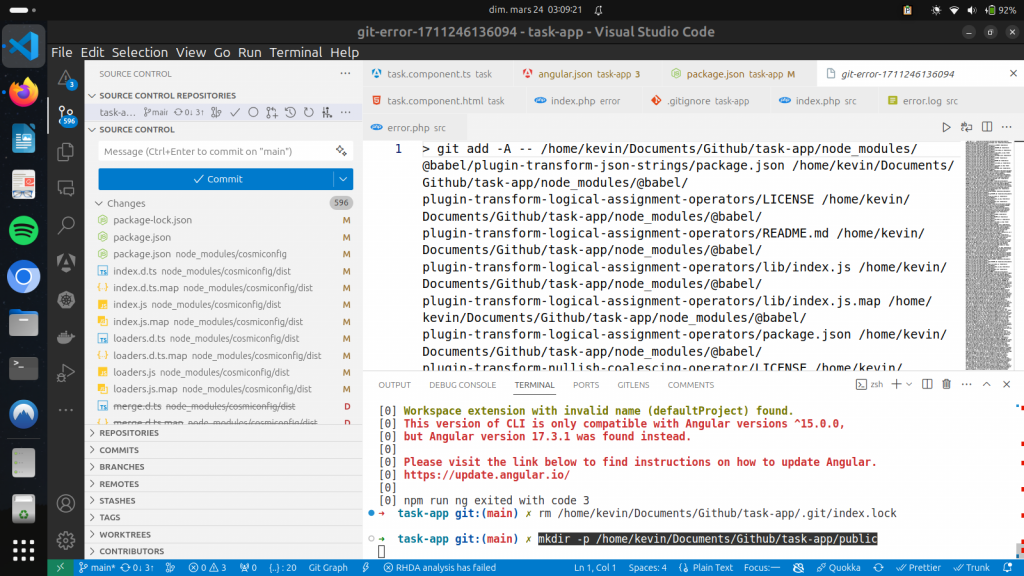
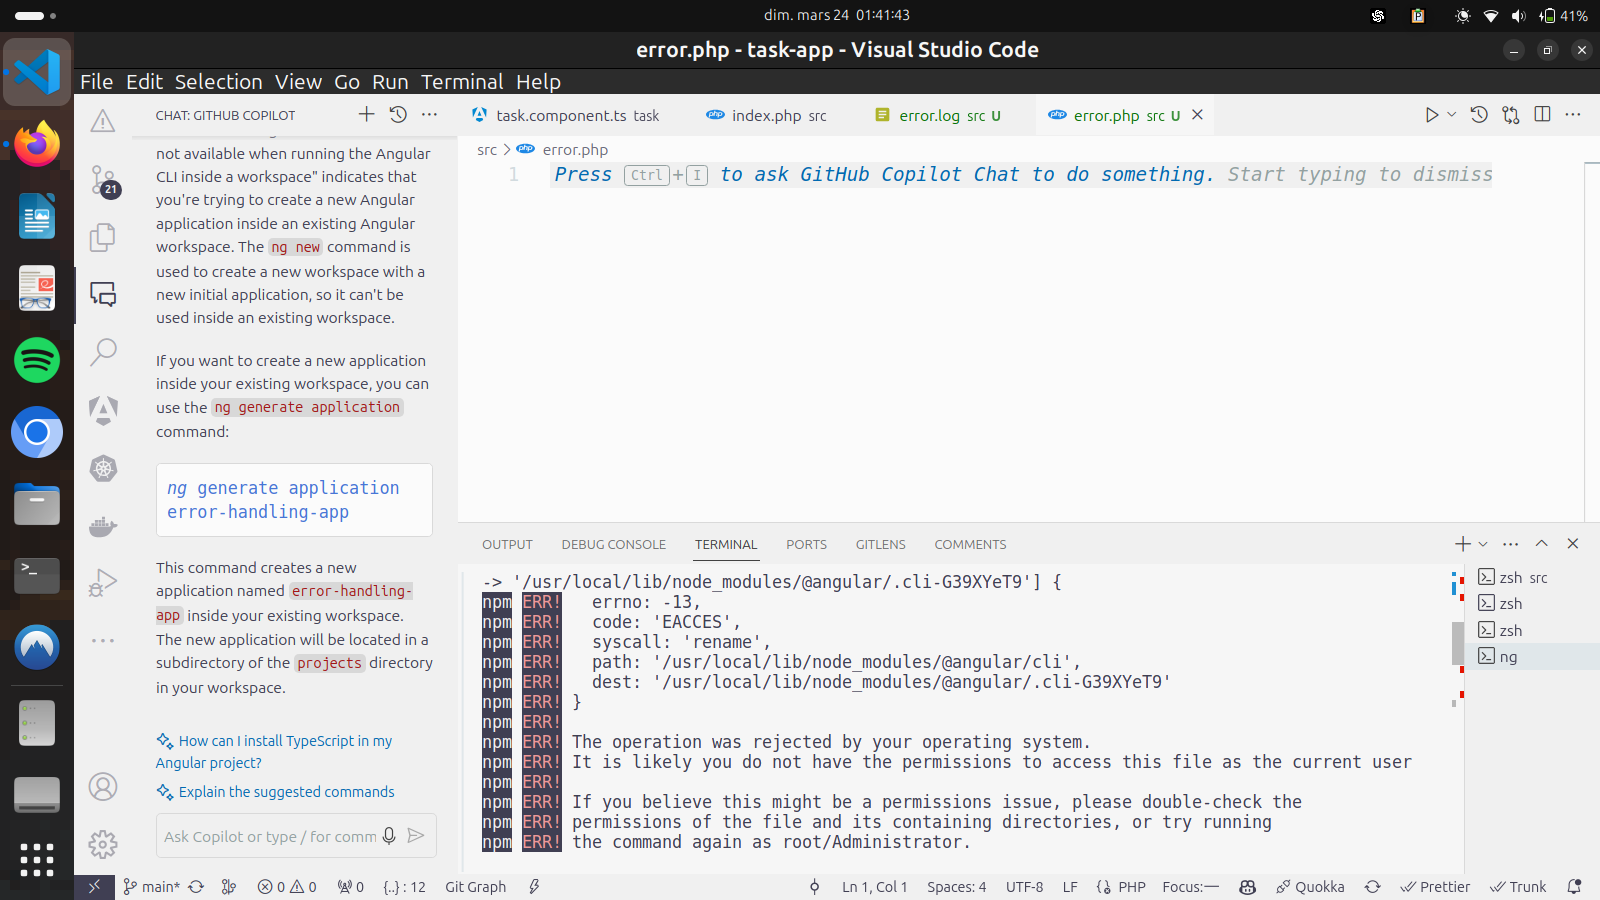
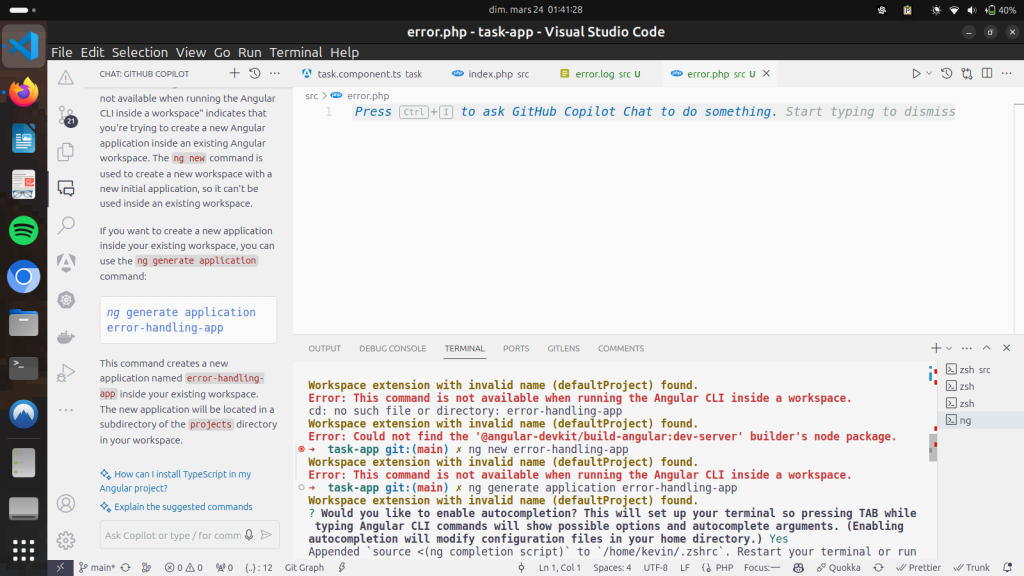
and relocated the necessary server-served files into this newly forged directory.
Correct the Directory Path: Realizing the public/ directory existed but was elsewhere, I updated the npm run php script in the package.json to align with the correct path, ensuring harmony between my directory structure and server expectations.
2. Node.js Odd Version Warning
While not critical for development, it hinted at potential instability for production.
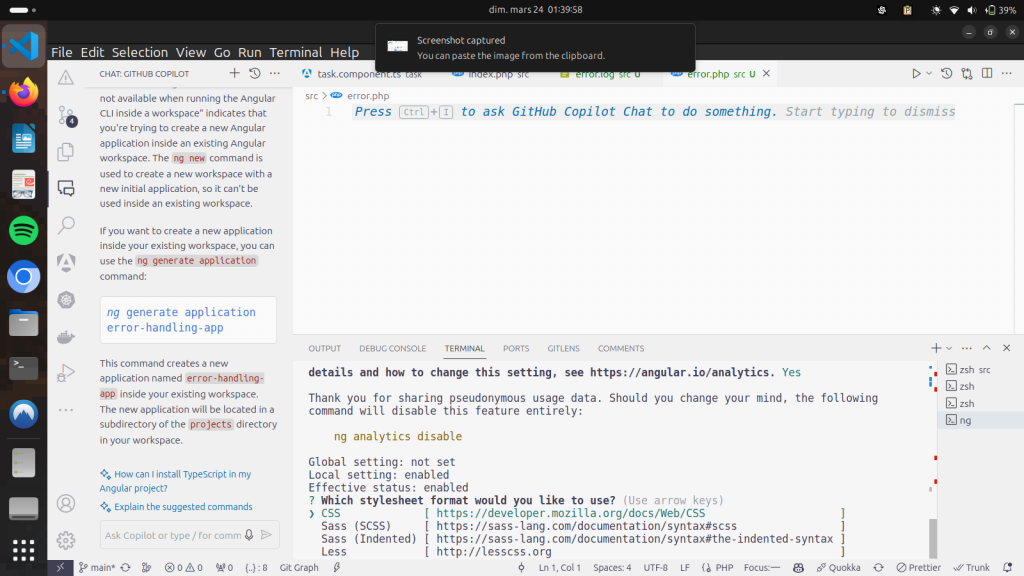
Switch to an LTS Version of Node.js: I turned to nvm (Node Version Manager) to adopt a more stable, even-numbered LTS version of Node.js, casting:
nvm install 16 && nvm use 16
This ensured a foundation of stability and long-term support for my application.
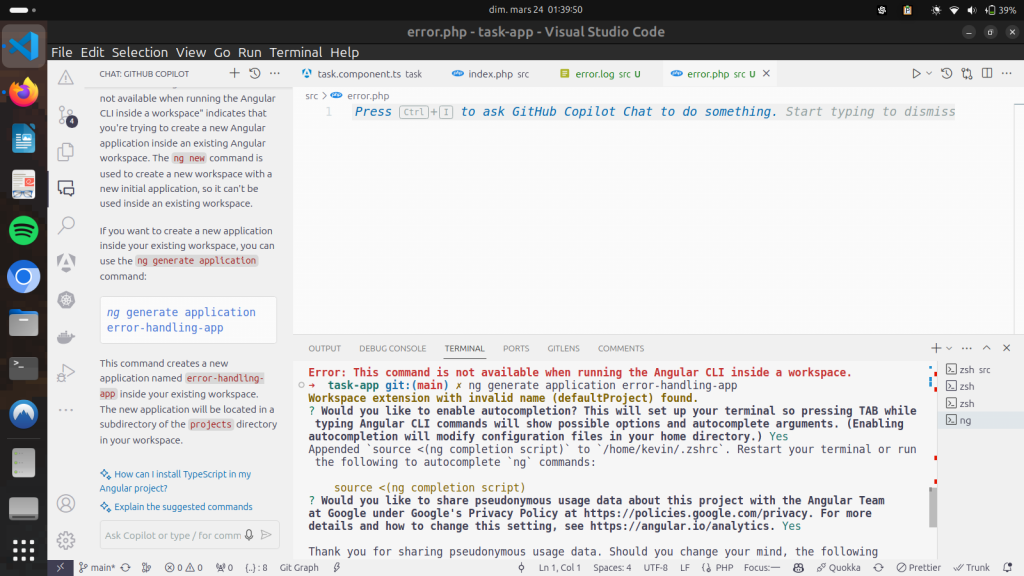
3. Angular Version Compatibility Issue
The most vexing issue arose from a discord between the Angular version (17.3.1) in use and the installed Angular CLI version, leading to compatibility concerns.
Update Angular CLI: To mend this rift, I updated both the global and local project’s Angular CLI to versions that resonate with Angular 17, executing:
Utilizing npx ng serve enabled the project’s specific version of Angular CLI to come forth.
Follow Angular Update Guide: For a tailored path through this conundrum, I sought guidance from the Angular Update Guide, which provided a map of instructions specific to my journey from current to desired Angular versions.
After Addressing These Concerns
Embarking on npm start once more brought me closer to a seamless application startup. Should you face similar beasts, remember to isolate each problem and apply the fitting solution with precision and care.
Armed with knowledge and experience from these encounters, I encourage you to face your development challenges with courage and curiosity. Remember, every problem bears a solution, each bug a lesson in disguise.
Quekokia is a Visual Studio Code extension designed to enhance the development experience for Vue.js projects. It provides a range of features, from syntax highlighting to advanced project management capabilities, all aimed at boosting developer productivity and making Vue.js development smoother and more efficient.
Key Features of Quekokia
Syntax Highlighting: Enhances code readability by providing clear and customizable color schemes for Vue.js syntax.
Snippets: Offers a collection of code snippets for common Vue.js patterns, significantly speeding up the coding process.
Project Scaffolding: Quickly generates Vue.js project templates, helping developers to set up new projects with ease.
Debugging Tools: Integrates with VS Code’s debugging capabilities, allowing developers to troubleshoot their Vue.js applications more effectively.
To begin using Quekokia in your Vue.js projects, follow these simple steps:
Install Visual Studio Code: If you haven’t already, download and install VS Code from the official website.
Install the Quekokia Extension: Open the Extensions view in VS Code by clicking on the square icon on the sidebar or pressing Ctrl+Shift+X. Search for "Quekokia" and click on the install button.
Enjoy Enhanced Vue.js Development: Once installed, Quekokia will automatically enhance your Vue.js development experience with its range of features.
Example Snippet Usage
One of the standout features of Quekokia is its rich set of snippets that cater specifically to Vue.js development. Here’s an example snippet for creating a new Vue component:
This snippet outlines a basic structure of a Vue component, including template, script, and scoped style sections, showcasing how Quekokia can expedite the development process by providing ready-to-use code templates.
Why Choose Quekokia for Vue.js Development?
Quekokia stands out due to its deep integration with Vue.js and Visual Studio Code, offering features that are specifically tailored to improve the Vue.js development workflow. Whether it’s through speeding up project setup, enhancing code readability, or simplifying debugging processes, Quekokia provides tangible benefits that can make a developer’s life easier.
Moreover, Quekokia’s active development and supportive community mean that it’s constantly evolving, with new features and improvements being added regularly to keep pace with the latest trends in Vue.js development.
Conclusion
Quekokia is a powerful extension for Visual Studio Code that can significantly enhance the development experience for Vue.js developers. By streamlining various aspects of the development process, Quekokia not only boosts productivity but also allows developers to focus more on creating high-quality Vue.js applications. If you’re working with Vue.js in VS Code, Quekokia is definitely worth exploring.
Frontend Journey with Angular: Angular acts as our herald, dynamically presenting error messages to the user. It’s flexible enough to communicate with the backend, fetching the specifics of the error encountered.
Backend Quest with PHP: The PHP backend serves as the keeper of knowledge, providing details about the errors through an API endpoint that our Angular front-end can consult.
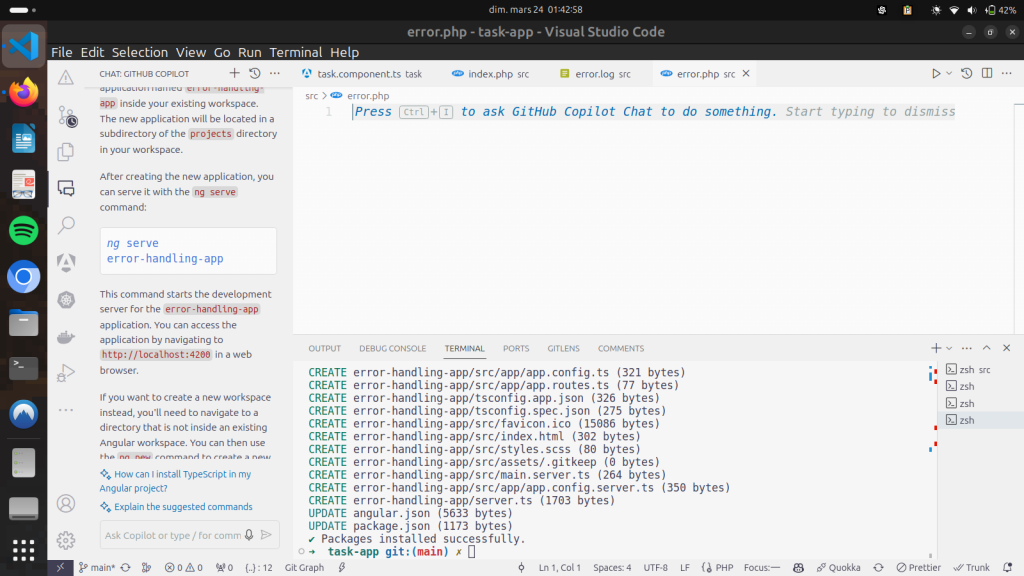
Step 1: Setting Up the Angular Environment
The first step in our quest is to prepare our Angular environment:
ng new error-handling-app
cd error-handling-app
ng serve
Step 2: Enchanting the Angular AppComponent
To capture and display errors, we modify the src/app/app.component.ts: