Who loves creating apps.

Tag: php (Page 3 of 4)

The Morning Ritual: Preparing for Battle 🌅

With a steaming cup of coffee by my side and Visual Studio Code open at 8a.m, I’m ready to conquer the day. My strategy? The Pomodoro Technique: 45 minutes of uninterrupted coding, followed by a 15-minute break. This rhythm, accompanied by Python podcasts and ambient music, keeps my mind sharp and my creativity flowing.

Setting the Stage with Laravel and Three.js

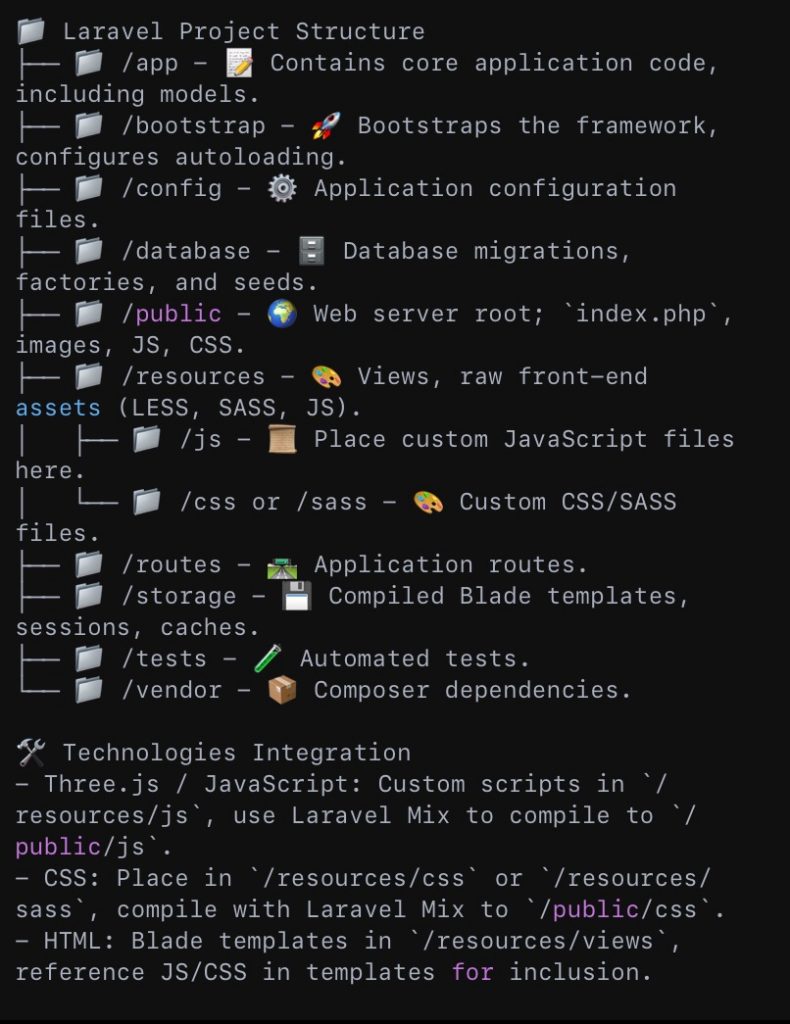
Laravel, a PHP framework known for its elegance and simplicity, forms the backbone of my project. Its robust features, such as routing, security, and templating, make it an ideal candidate for building the API. Meanwhile, Three.js stands ready to breathe life into the web fonts in vibrant 3D.

# Installing Laravel

composer create-project --prefer-dist laravel/laravel fontRevolution

# Adding Three.js via npm

cd fontRevolution npm install three

Crafting the API with Laravel

// routes/api.php

Route::get('/fonts', 'FontController@index');

// app/Http/Controllers/FontController.php

public function index() {

return response()->json([ 'fonts' => Font::all()->transform(function($font) {

return ['name' => $font->name, 'url' => $font->url];

}) ]);

}

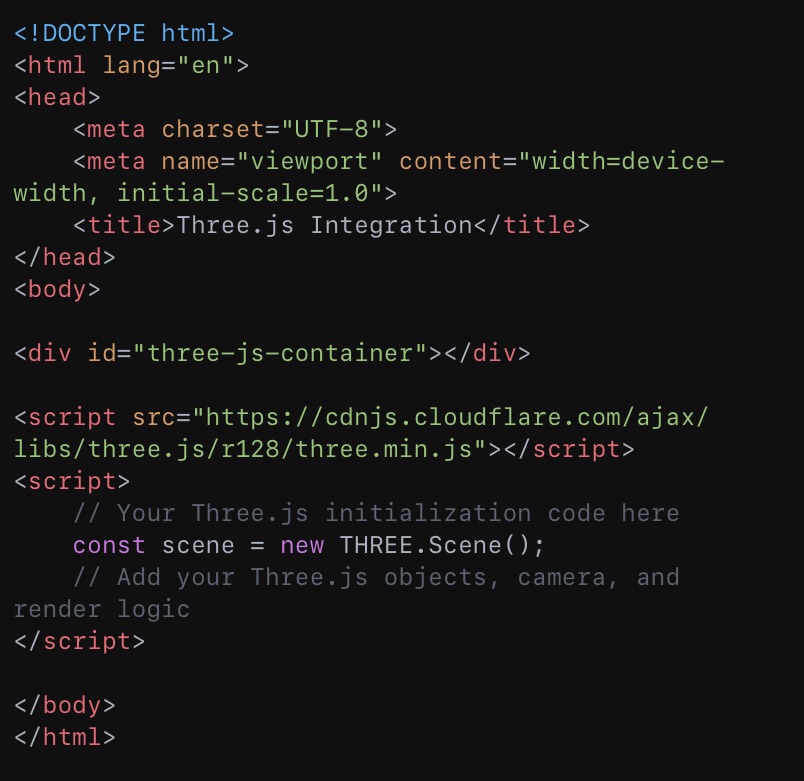
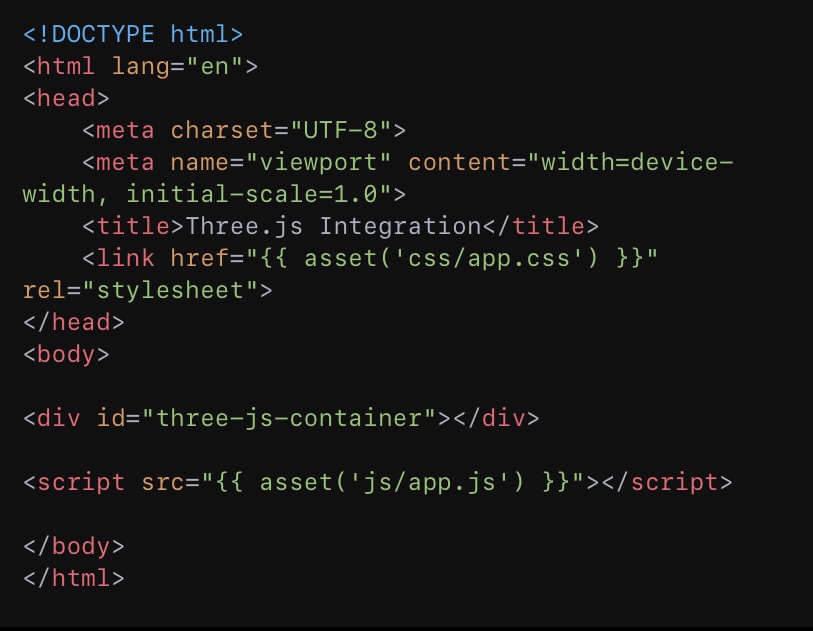
Bringing Fonts to Life with Three.js

import * as THREE from 'three';

let camera, scene, renderer, fontMesh;

init();

animate();

function init() {

// Scene setup...

camera = new THREE.PerspectiveCamera(75, window.innerWidth / window.innerHeight, 1, 5000);

scene = new THREE.Scene();

renderer = new THREE.WebGLRenderer(); renderer.setSize(window.innerWidth, window.innerHeight); document.body.appendChild(renderer.domElement); // Load a font and create 3D text...

const loader = new THREE.FontLoader();

loader.load('path/to/font.json', function (font) {

const geometry = new THREE.TextGeometry('Hello World!', {

font: font, size: 80, height: 5, curveSegments: 12,

});

const material = new THREE.MeshBasicMaterial({ color: 0xf3f3f3 }); fontMesh = new THREE.Mesh(geometry, material); scene.add(fontMesh);

});

} function animate() { requestAnimationFrame(animate); // Animations go here...

fontMesh.rotation.x += 0.01; fontMesh.rotation.y += 0.01; renderer.render(scene, camera); }

This example demonstrates the basics of creating 3D text with Three.js and adding it to our scene. The text animates continuously, showcasing the potential of dynamic web fonts.

Sustainability Through Support 🌍

After hours of coding, I ponder the sustainability of my project. To maintain the servers and hosting without resorting to intrusive ads, I decide to incorporate a donation link to my Ko-fi page. This way, supporters can fuel the project directly, ensuring its longevity and impact.

<!-- Add a Ko-fi donation button -->

<a href="https://ko-fi.com/kvnbbg" target="_blank">Support the project on Ko-fi!</a>

Laravel & Three.js

Three.js is a powerful JavaScript library and API used to create and display animated 3D graphics in a web browser using WebGL. It’s a tool that complements the front-end ecosystem, allowing developers to integrate sophisticated 3D visualizations directly into their web applications.

Enhancing Web Experiences with Three.js

Let’s extend our discussion by exploring how to integrate a simple Three.js scene into a web application. This example will create a rotating 3D cube within a Laravel application, illustrating the seamless connection between server-side management and client-side innovation.

Setting Up

Before we dive into the code, ensure you have Node.js installed to manage packages like Three.js. For Laravel, Composer and PHP should be set up in your environment.

  1. Install Three.js: In your Laravel project’s root directory, use npm to install Three.js:

npm install three

  1. Add Three.js to Your Laravel Project: After installation, you can include Three.js in your project by importing it into the resource file where you’ll be creating your scene, typically a JavaScript file located in resources/js/app.js or a similar custom script file that you include in your Laravel mix compilation.

Example: Creating a Rotating Cube with Three.js

Here is how you can create a simple rotating 3D cube using Three.js, which you can include in one of your Laravel views.

<!DOCTYPE html>

<html>

<head>

<title>3D Cube Example</title>

<style> body { margin: 0; } canvas { display: block; } </style>

</head>

<body>

<script src="/js/app.js"></script>

<!-- Ensure this path points to your compiled JS containing Three.js code -->

<script>

import * as THREE from 'three';

let scene, camera, renderer, cube;

function init() {

// Scene setup

scene = new THREE.Scene();

scene.background = new THREE.Color(0xdddddd);

// Camera setup

camera = new THREE.PerspectiveCamera(75, window.innerWidth / window.innerHeight, 0.1, 1000);

camera.position.z = 5;

// Renderer setup

renderer = new THREE.WebGLRenderer({antialias: true}); renderer.setSize(window.innerWidth, window.innerHeight); document.body.appendChild(renderer.domElement);

// Cube setup

const geometry = new THREE.BoxGeometry();

const material = new THREE.MeshBasicMaterial({ color: 0x00ff00 }); cube = new THREE.Mesh(geometry, material);

scene.add(cube);

animate();

}

function animate() {

requestAnimationFrame(animate); // Rotate cube

cube.rotation.x += 0.01;

cube.rotation.y += 0.01;

renderer.render(scene, camera);

}

init();

</script>

</body> </html>

In this example, we initialize a Three.js scene, create a camera and a renderer, and then create a cube with a simple geometry and material. We add the cube to our scene and create an animate function that updates the cube’s rotation before rendering the scene again, creating a continuous animation.

Conclusion

To incorporate this into a Laravel view, you can place the script within a Blade template or reference it externally from your public JavaScript assets compiled by Laravel Mix.

Integrating Front-end and Back-end

In the evolving landscape of web development, the line between front-end and back-end technologies is increasingly blurred.

PHP and Laravel: The Back-end Powerhouse

PHP has been a cornerstone of server-side web development for decades, offering simplicity, flexibility, and a vast ecosystem. Laravel, built on PHP, elevates this foundation with elegant syntax, robust features, and a thriving community. It’s designed to facilitate common tasks such as routing, sessions, caching, and authentication, making web development faster and more enjoyable.

Artisan: The Laravel Craftsman

A key feature of Laravel is Artisan, a command-line interface that automates many aspects of web development. From database migrations to model creation, Artisan commands streamline development workflows, enabling developers to focus on building features rather than managing infrastructure.

Bridging the Front-end and Back-end with Laravel

Laravel doesn’t stop at the back-end. With tools like Blade, Laravel’s templating engine, it bridges the gap to the front-end, allowing developers to seamlessly integrate server-side logic with client-side presentation.

Vue.js: A Reactive Partnership

While Laravel is server-side, it pairs exceptionally well with front-end frameworks like Vue.js. This synergy allows developers to build reactive components that enhance user experience, creating single-page applications (SPAs) with ease. Laravel’s mix tooling system simplifies the use of Vue.js, enabling efficient asset compilation and management.

jQuery and Bootstrap: Enhancing User Interactions

For projects requiring quick development or those with a preference for jQuery, Laravel accommodates seamless integration. jQuery enhances client-side scripting, offering a straightforward way to manipulate the DOM, handle events, and make AJAX requests. When combined with Bootstrap, a front-end framework, developers can rapidly prototype and build responsive web designs.

Swift: Bringing Laravel to Mobile

In the realm of mobile development, Swift for iOS offers an interesting crossroad. While not directly related to PHP or Laravel, Swift developers can consume Laravel-powered APIs to bring robust web application functionalities to mobile platforms, creating a cohesive ecosystem between web and mobile applications.

Laravel Documentation: A Gateway to Mastery

One of Laravel’s greatest assets is its comprehensive and well-structured documentation. It serves as a gateway for developers to delve into Laravel’s features, from beginner topics to advanced usage. The documentation is a testament to Laravel’s commitment to developer education and community support.

React and Laravel: A Modern Web Duo

React, a JavaScript library for building user interfaces, is another front-end technology that pairs well with Laravel. Utilizing React components within a Laravel application enables developers to create highly interactive and dynamic user experiences. Laravel’s API resources make it straightforward to build a RESTful API that React components can interact with, bridging the server-client gap effectively.

Conclusion

The web development landscape is rich and varied, with PHP and Laravel standing as testament to the power and flexibility of server-side programming. By leveraging Artisan, integrating with front-end technologies like jQuery, Bootstrap, Vue.js, and React, and utilizing the comprehensive Laravel documentation, developers are equipped to craft sophisticated web applications that are both robust and user-friendly.

Unveiling PHP and Laravel

A Comprehensive Guide for Modern Web Development

In the evolving landscape of web development, PHP has long stood as a foundational language, powering a significant portion of the internet. Enter Laravel, a PHP framework known for its elegant syntax, robust features, and ability to facilitate rapid application development. This article explores the use case scenarios for Laravel, guides you through its installation on a Linux system, and provides a bug-free script example.

Laravel: The PHP Framework for Web Artisans

Laravel is designed to make web development tasks simpler and more efficient. It achieves this through expressive syntax, its template engine (Blade), ORM (Eloquent), and comprehensive ecosystem including tools like Artisan, Laravel Mix, and various packages for development tasks.

Use Cases for Laravel:

  • Enterprise Applications: Laravel’s robustness makes it suitable for large-scale applications, offering advanced security features, efficient database management, and scalable architecture.
  • Content Management Systems (CMS): Though WordPress dominates this space, Laravel allows developers to build customized CMS tailored to specific needs.
  • E-commerce Platforms: With packages like Aimeos, Laravel is an excellent choice for crafting comprehensive e-commerce solutions.
  • APIs for Mobile Applications: Laravel’s ability to serve as a backend API makes it a prime candidate for mobile app development.

Installing Laravel on Linux

Before diving into the code, ensure you have PHP (7.3 or higher), Composer (PHP’s package manager), and a database (MySQL, PostgreSQL) installed. Follow these steps to install Laravel:

  1. Install Composer:

curl -sS https://getcomposer.org/installer | php sudo mv composer.phar /usr/local/bin/composer

  1. Install Laravel via Composer:

composer create-project --prefer-dist laravel/laravel myLaravelApp

  1. Set Up Environment:

Navigate to your project folder and configure your .env file to match your database and environment settings.

  1. Serve the Application:

php artisan serve

This command launches a development server. Your Laravel application is now accessible at http://localhost:8000.

Crafting an Authentication System

Laravel simplifies authentication through its built-in features. Use the following Artisan command to scaffold basic login and registration views:php artisan ui vue --auth

This command sets up the necessary views and backend logic for authentication.

Note: As of Laravel 8, you might need to use Laravel Breeze or Jetstream for a more comprehensive authentication system, including two-factor authentication and API support.

Example Script: Managing SQL Data with Eloquent

Eloquent ORM allows for elegant syntax when interacting with the database. Here’s a simple example:<?php use App\Models\User; // Retrieve a user by ID $user = User::find(1); // Update the user's name $user->name = 'Jane Doe'; $user->save();

This script demonstrates fetching and updating data, showcasing Laravel’s straightforward and bug-free approach to database management.

Building the Views

Laravel utilizes the Blade templating engine, enabling you to craft dynamic HTML templates easily. Here’s a basic structure for login.blade.php, register.blade.php, and dashboard.blade.php views within the resources/views directory:

  • Login View (login.blade.php):

{{-- Extend your main layout --}} @extends('layouts.app') @section('content') {{-- Login form here --}} @endsection

  • Register View (register.blade.php):

Similar to the login view, include form fields for user registration details.

  • Dashboard View (dashboard.blade.php):

This view might display user-specific data post-login, providing a personalized experience.

Conclusion

Laravel empowers developers to build sophisticated web applications with PHP, streamlining tasks from authentication to database management. By following the outlined steps to install Laravel, leverage its authentication scaffolding, and manage SQL data elegantly, developers can create secure, efficient, and user-friendly web platforms.

Integrating Vue.js with PHP in VS Code and Creating a Simple API

Setting Up Vue.js with PHP in VS Code

1. Setting Up PHP:
Ensure you have PHP installed on your system and set up a local server environment (e.g., XAMPP, MAMP, or WAMP).

2. Installing Vue CLI:
Vue CLI is a command-line tool for Vue.js development. Install it globally using npm:npm install -g @vue/cli

3. Creating a Vue Project:
Navigate to your project directory and create a new Vue project:vue create my-vue-app

Choose the default preset or customize your setup as required.

4. Integrating PHP:
Within the same project directory, create a folder for your PHP scripts, e.g., api. This is where you’ll store PHP files, like your API endpoints.

5. Configuring Vue.js to Proxy API Requests:
To integrate your Vue.js app with PHP running on a local server, configure a proxy in your Vue.js app’s vue.config.js file:module.exports = { devServer: { proxy: 'http://localhost:your_php_server_port', }, }

This setup allows you to make API requests to your PHP server from your Vue.js application during development.

Crafting a Simple PHP API

Create a PHP file inside your api directory. This example demonstrates a simple API that returns book details.

api/books.php:<?php header('Content-Type: application/json'); class Book { public $title; public $author; public $pages; public function __construct($title, $author, $pages) { $this->title = $title; $this->author = $author; $this->pages = $pages; } } // Sample book $book1 = new Book('Lord of the Rings', 'J.R.R. Tolkien', 1178); echo json_encode($book1);

This script defines a Book class with a constructor to initialize book objects. When books.php is accessed, it instantiates a Book object and returns its details in JSON format.

Object-Oriented PHP: Constructors and Instances

In PHP, constructors are special methods invoked at the creation of an object. They are ideal for initializing an object’s properties. The __construct method in the Book class demonstrates how PHP allows you to set up objects with different titles, authors, and page numbers.

Usage:

When you create a new instance of the Book class:$book2 = new Book('Lord of the Rings', 'J.R.R. Tolkien', 1178);

You’re calling the constructor method, which sets the title, author, and pages of the book2 object. This approach highlights PHP’s beautiful syntax for managing object-oriented programming, making code more readable and maintainable.

Conclusion

Combining Vue.js with PHP in VS Code for front-end and API development respectively, offers a powerful toolkit for creating dynamic web applications. The setup process involves configuring Vue.js to work alongside a PHP backend, facilitating seamless development and testing. Additionally, employing object-oriented programming practices in PHP, like using constructors for object initialization, further enhances the application’s structure and efficiency. This blend of technologies and programming paradigms enables developers to craft responsive, data-driven web experiences.

Mastering phpMyAdmin

Managing Databases

In the realm of web development, efficient database management is crucial. phpMyAdmin, a free and open-source administration tool for MySQL and MariaDB, stands out as a pivotal resource for developers.

Understanding phpMyAdmin

phpMyAdmin is a web-based application that provides a user-friendly interface for handling the administration of MySQL databases. It allows users to perform a variety of database tasks including creating, modifying, and deleting databases and tables; executing SQL statements; managing users and permissions; and importing and exporting data, all through a web browser.

The Algorithm for a Luxury Bag in phpMyAdmin

Imagine managing an inventory of luxury bags with varying qualities and values. Here’s how you might use phpMyAdmin to maintain this data:

  1. Creating the Database:
    First, log into phpMyAdmin and create a new database for our e-commerce platform, luxury_bags.
  2. Defining the Tables:
    Within the luxury_bags database, create a table called bags with fields for id, name, quality, and value. The id will be an auto-incrementing primary key.
  3. Inserting Data:
    Use phpMyAdmin’s insert functionality to add records for each bag. For example, a record might include a name like “Vintage Chanel”, a quality rating, and its current market value.
  4. Updating Bag Values:
    Over time, as bags appreciate in value, use phpMyAdmin’s update functionality to adjust the value field. This can be done manually or through SQL queries.

Integrating PHP with JavaScript

In a dynamic e-commerce platform, PHP might handle server-side logic and database interactions, while JavaScript enhances the front-end with interactivity. For instance, PHP can fetch the current inventory of luxury bags from the database, and JavaScript can then dynamically display this data on the website, updating the UI without needing to refresh the page.

Example:
PHP fetches bag data and encodes it as JSON:

<?php

// PHP code to query the 'bags' table and fetch all records

echo json_encode($bagsData);

?>

JavaScript fetches this data and updates the web page dynamically:

fetch('getBagsData.php') .then(response => response.json()) .then(data => {

// Use JavaScript to dynamically display bag data on the page

});

or

PHP Functions in WordPress

WordPress, a content management system written in PHP, heavily relies on functions to extend its functionality. Themes and plugins use WordPress’s hooks and APIs to add custom features or modify existing ones.

Example:
To customize how posts are displayed, a WordPress theme might use the add_action() function to hook into the the_content action hook:

function customize_post_display($content) {

// Modify post content here

return $content;

}

add_action('the_content', 'customize_post_display');

This PHP function alters the content of posts, demonstrating the tight integration between PHP and WordPress functionality.

Conclusion

phpMyAdmin serves as a bridge between the technical database management tasks and the user-friendly web interface, facilitating the efficient management of data for web applications like a luxury bag e-commerce platform. The symbiotic relationship between PHP and JavaScript enables the creation of dynamic, user-engaging web applications, while the use of PHP functions within WordPress underscores the flexibility and power of PHP in web development contexts.

a Modular PHP Website for Dynamic Content

Why site.php Instead of index.php?

Choosing site.php over index.php or index.html can be a matter of specific functionality or personal preference. For instance, site.php might serve as a specific page within your site rather than the entry point that index.php typically represents. PHP’s flexibility allows developers to structure their sites according to their unique requirements.

Creating Modular HTML Files

In your www folder, create two files: header.html and footer.html. These files will contain the HTML code common to all pages, such as the navigation menu and footer information.

header.html:

<!DOCTYPE html>

<html lang="en">

<head>

<meta charset="UTF-8">

<meta name="viewport" content="width=device-width, initial-scale=1.0">

<title>Modular PHP Website</title>

<!-- Add your CSS files here -->

</head>

<body>

<header>

<h1>Welcome to Our Website</h1>

<!-- Navigation menu here -->

</header>

footer.html:

<footer> <p>&copy; 2024 by Your Website. All rights reserved.</p> </footer> </body> </html>

Integrating the Header and Footer in site.php

In your site.php, include the header and footer files at the beginning and end of your content, respectively.

site.php:

<?php include 'header.html'; ?>

<p>Hello, I'm Jina. I will show you the bag we have talked about.</p>

<!-- Dynamic content and animations go here -->

<?php include 'footer.html'; ?>

Triggering Front-End Animations from PHP

While PHP is a server-side language and cannot directly manipulate the front-end, it can conditionally load JavaScript or CSS that triggers animations based on server-side logic.

For example, to load a specific animation after displaying the message in site.php, you can do the following:

site.php (addition):

<script>

window.onload = function() {

// Example animation trigger document.getElementById('loadingAnimation').style.display = 'block';

setTimeout(function() {

document.getElementById('loadingAnimation').style.display = 'none';

}, 3000); // Hides the animation after 3 seconds }

</script>

<div id="loadingAnimation" style="display:none;">

<!-- Your animation HTML here -->

<p>Loading...</p>

</div>

Building a Simple API with PHP

PHP can also be used to create APIs, allowing your website to interact with other applications and services.

Example API (api.php):

<?php

header('Content-Type: application/json'); // Simulated data

$data = [ ['id' => 1, 'name' => 'Luxury Bag', 'price' => 77.7],

// Additional

items... ];

// Respond with JSON

echo json_encode($data);

This script sets the content type to application/json and echoes out data in JSON format, which can be consumed by front-end JavaScript using AJAX or a framework like Vue.js or React.

Conclusion

By breaking down a PHP website into modular components like header.html and footer.html, developers can streamline their workflow and ensure consistency across the site. Although PHP operates on the server-side, it can prepare the ground for dynamic client-side interactions, including animations. Furthermore, PHP’s versatility extends to creating APIs, further expanding the capabilities of your website to interact dynamically with other services and applications. This approach to web development offers a blend of maintainability, dynamic content delivery, and interaction.

Mastering Loops in PHP

While vs. For Loop with Luxurious Insights

In PHP, loops play a crucial role in automating repetitive tasks, among the various types of loops, while and for loops are particularly noteworthy for their versatility and use cases.

Understanding the While Loop

The while loop continues to execute a block of code as long as a specified condition remains true. It’s ideal for situations where the number of iterations isn’t predetermined. The structure is as follows: while (condition) { // code to be executed }

Example: Imagine an e-commerce system where a luxury bag’s value increases over time until it reaches a peak. The while loop is perfect for incrementing the bag’s value gradually.

<?php

$bagValue = 1000; // Initial value

$peakValue = 2000; // Value at which the bag's quality no longer increases

while ($bagValue < $peakValue) {

$bagValue += 100; // Increase value by 100

echo "The bag's value is now $bagValue.<br>";

}

?>

Mastering the For Loop

The for loop is used when the number of iterations is known before the loop starts. Its syntax allows you to initialize your counter, test the counter, and increment/decrement it, all in one line.for (initialization; condition; increment) { // code to be executed }

Example: Let’s apply the for loop to model a scenario where an e-commerce platform processes a fixed number of orders, each adding value to a luxury item.

<?php

$orders = 10; // Fixed number of orders

for ($i = 1; $i <= $orders; $i++) {

$bagValue += 50; // Each order increases the bag's value by 50

echo "After order $i, the bag's value is $bagValue.<br>";

}

?>

Key Differences Between While and For Loops

  • Initialization: In a for loop, the counter is usually initialized within the loop syntax. In contrast, a while loop requires the counter to be initialized outside the loop.
  • Condition: Both loops use a condition to determine the continuity of the loop. However, the for loop encapsulates the entire loop logic succinctly in one line.
  • Iteration: The for loop often includes the increment/decrement operation as part of its syntax, making it a compact choice for iterating a known number of times. The while loop may require an extra line of code for this operation.

Practical Application: Luxury E-commerce Platform

Consider an e-commerce platform specializing in luxury goods where items gain value with each transaction. Using loops to calculate the increasing value of a luxury bag can automate price adjustments based on demand and sales.

Using Equations for Dynamic Pricing:

// Assume each sale increases the next item's price by a growth factor $growthFactor = 1.05;

// 5% value increase per sale

$currentValue = 1000; // Starting value

$totalSales = 10; // Total sales to process

for ($sale = 1; $sale <= $totalSales; $sale++) {

$currentValue *= $growthFactor; // Increase value by the growth factor

echo "After sale $sale, the bag's value is $" . number_format($currentValue, 2) . "<br>";

}

Conclusion

Understanding and choosing between while and for loops in PHP depends on the specific requirements of your project, such as whether the number of iterations is known beforehand. For dynamic scenarios like a luxury item’s value increasing with each sale in an e-commerce context, loops are invaluable tools for implementing sophisticated pricing models.

Crafting a Modern Login Page

Setting Up the PHP Backend

Begin by establishing the backbone of your login system with PHP. A simple User class can manage user information and authentication status. For the login mechanism, consider using a secure method to verify user credentials, such as password hashing and session management.

<?php

if (empty($_SESSION['csrf_token'])) { $_SESSION['csrf_token'] = bin2hex(random_bytes(32)); }

session_start();

class User {

public $username;

private $passwordHash;

public function __construct($username, $passwordHash) {

$this->username = $username;

$this->passwordHash = $passwordHash;

}

public function verifyPassword($password) {

return password_verify($password, $this->passwordHash);

} } // Simulate a user for demonstration purposes

$demoUser = new User("Alex", password_hash("securepassword123", PASSWORD_DEFAULT)); // Verify login credentials (normally, you'd get these from a database)

if (isset($_POST['username']) && isset($_POST['password'])) {

if ($demoUser->username === $_POST['username'] && $demoUser->verifyPassword($_POST['password'])) {

$_SESSION['user'] = $demoUser->username;

echo "Login successful. Welcome, " . htmlspecialchars($demoUser->username) . "!";

}

else {

echo "Login failed. Please check your credentials.";

} }

?>

Include this token as a hidden field within your form to ensure that form submissions are valid and originated from your website.

Crafting the Form

Create your login form with HTML and style it with modern CSS:

<form method="POST" action="login.php">

<label for="username">Username:</label>

<input type="text" id="username" name="username" required>

<label for="password">Password:</label>

<input type="password" id="password" name="password" required>

<input type="hidden" name="csrf_token" value="<?php echo $_SESSION['csrf_token']; ?>">

<button type="submit">Login</button>

</form>

Modern CSS for Styling

Use modern CSS techniques to style your form, ensuring it’s responsive and visually appealing. Consider using CSS variables for easy theme management and Flexbox or Grid for layout.

:root { --primary-color: #007bff; --text-color: #444; }

form { max-width: 400px; margin: auto; padding: 20px; box-shadow: 0 0 10px rgba(0, 0, 0, 0.1); }

form label { margin-top: 10px; display: block; }

form input { width: 100%; padding: 10px; margin-top: 5px; box-sizing: border-box; }

button { background-color: var(--primary-color); color: white; padding: 10px 20px; border: none; cursor: pointer; margin-top: 10px; }

button:hover { background-color: darken(var(--primary-color), 10%); }

Adding JavaScript for Dynamic Interactions

document.getElementById('loginForm').addEventListener('submit', function(e) {

const username = document.getElementById('username').value;

const password = document.getElementById('password').value;

if (username.length === 0 || password.length === 0) {

alert('Please fill in all fields.');

e.preventDefault(); // Prevent form submission

}

});

Exploring the Foundations of PHP and OOP

Innovations in Social Networking

PHP, a server-side scripting language designed for web development but also used as a general-purpose programming language, has been pivotal in the evolution of dynamic websites and applications. Created by Rasmus Lerdorf in 1994, PHP has grown to become one of the most widely used languages for server-side logic, thanks in part to its simplicity, efficiency, and powerful capabilities in object-oriented programming (OOP).

PHP and Object-Oriented Programming (OOP)

Object-oriented programming in PHP allows developers to organize code into classes and objects, encapsulating data and behaviors in a manner that models real-world entities. OOP principles like inheritance, encapsulation, and polymorphism enable developers to create modular, reusable code. An example of OOP in action could be representing user identities in a social network:

<?php

class User {

public $isMale;

public $name;

function __construct($name, $isMale) {

$this->name = $name;

$this->isMale = $isMale;

}

function greet() {

if ($this->isMale) {

echo "Hello, Mr. " . $this->name;

}

else

{

echo "Hello, Ms. " . $this->name;

} } } // Creating a new User instance

$user1 = new User("Alex", true);

$user1->greet(); // Outputs: Hello, Mr. Alex

?>

This basic example encapsulates user data and provides a method to greet the user differently based on their gender, illustrating how PHP’s OOP features can be used to model complex behaviors and data structures.

Software Development Life Cycle (SDLC) and PHP

Incorporating PHP into the Software Development Life Cycle (SDLC) of a project, especially in the development of a social network, requires careful planning and execution. The SDLC encompasses several phases, including planning, design, development, testing, deployment, and maintenance.

An effective use of PHP in this context involves applying OOP principles to model user interactions and data. For instance, using classes to represent entities like posts, comments, and messages can streamline the development process and facilitate future enhancements.

PHP Frameworks: Elevating Development

Frameworks in PHP, such as Laravel, Symfony, and CodeIgniter, offer structured, efficient ways to build applications.

Laravel, for instance, offers an elegant syntax and features like Eloquent ORM for database interactions, Blade templating engine, and robust security features, making it a popular choice for developing complex applications like social networks.

« Older posts Newer posts »

© 2024 Kvnbbg.fr

Theme by Anders NorénUp ↑

Verified by MonsterInsights