Who loves creating apps.

Tag: app (Page 2 of 2)

a simple yet effective task manager in Java—a project perfectly suited for enriching weekend coding sessions.

Step 1: Define the Task Class

Our journey begins with the creation of the Task class, the cornerstone of our application. This class represents the tasks our users will manage:

public class Task {
    private String description;
    private boolean isCompleted;

    public Task(String description) {
        this.description = description;
        this.isCompleted = false;
    }

    public String getDescription() {
        return description;
    }

    public boolean isCompleted() {
        return isCompleted;
    }

    public void completeTask() {
        isCompleted = true;
    }

    @Override
    public String toString() {
        return (isCompleted ? "[X] " : "[ ] ") + description;
    }
}

Step 2: Task Logic

With our Task class defined, we introduce the TaskManager class to encapsulate our application’s logic, including adding, viewing, completing, and deleting tasks:

import java.util.ArrayList;
import java.util.Scanner;

public class TaskManager {
    private ArrayList<Task> tasks = new ArrayList<>();
    private Scanner scanner = new Scanner(System.in);

    public void start() {
        boolean isRunning = true;

        while (isRunning) {
            System.out.println("Task Manager - Choose an action: (1) Add Task (2) View Tasks (3) Complete Task (4) Exit");
            String action = scanner.nextLine();

            switch (action) {
                case "1":
                    addTask();
                    break;
                case "2":
                    viewTasks();
                    break;
                case "3":
                    completeTask();
                    break;
                case "4":
                    isRunning = false;
                    break;
                default:
                    System.out.println("Invalid option. Please choose a valid action.");
            }
        }
    }

    private void addTask() {
        System.out.println("Enter task description:");
        String description = scanner.nextLine();
        tasks.add(new Task(description));
        System.out.println("Task added.");
    }

    private void viewTasks() {
        if (tasks.isEmpty()) {
            System.out.println("No tasks available.");
        } else {
            for (int i = 0; i < tasks.size(); i++) {
                System.out.println((i + 1) + ". " + tasks.get(i));
            }
        }
    }

    private void completeTask() {
        viewTasks();
        System.out.println("Enter the number of the task to complete:");
        int taskNumber = Integer.parseInt(scanner.nextLine());
        if (taskNumber >= 1 && taskNumber <= tasks.size()) {
            tasks.get(taskNumber - 1).completeTask();
            System.out.println("Task completed.");
        } else {
            System.out.println("Invalid task number.");
        }
    }
}

Step 3: Running the Task Manager

To breathe life into our Task Manager, we craft a Main class to serve as the entry point for our application:

public class Main {
    public static void main(String[] args) {
        TaskManager taskManager = new TaskManager();
        taskManager.start();
    }
}

How to Run

  1. Compile the Java Files: Use the javac command in your terminal within the directory containing your .java files.

    javac Task.java TaskManager.java Main.java
  2. Run the Application:

    java Main

Resources for the Java Adventurer

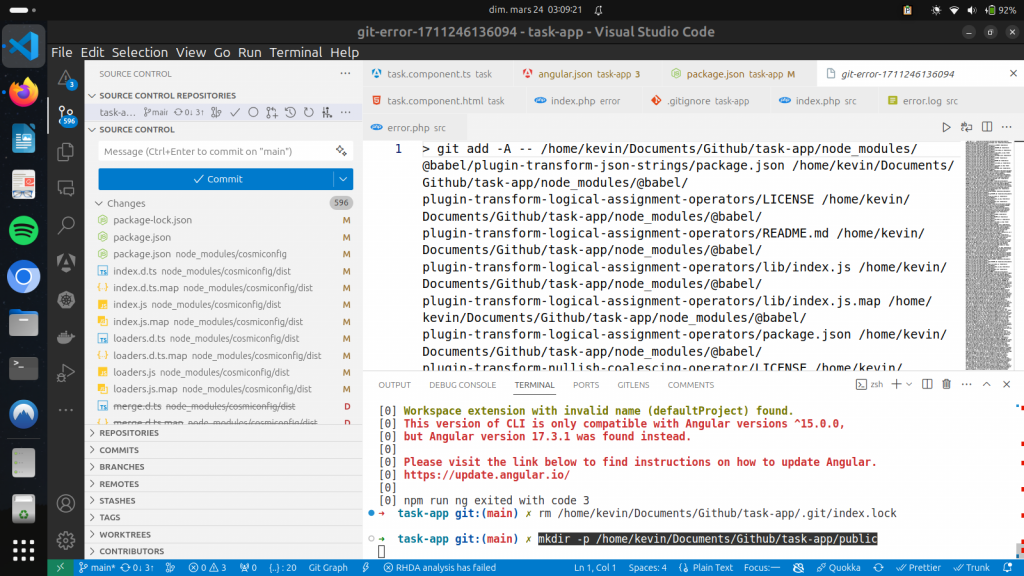
Let’s methodically address these issues to pave the way for a flawless application startup.

1. Directory public/ does not exist

The absence of a public/ directory was the first hurdle. This directory is essential for serving files through the PHP server.

  • Ensure the public/ Directory Exists: I created the missing directory with the command:

    mkdir -p /home/kevin/Documents/Github/task-app/public

    and relocated the necessary server-served files into this newly forged directory.

  • Correct the Directory Path: Realizing the public/ directory existed but was elsewhere, I updated the npm run php script in the package.json to align with the correct path, ensuring harmony between my directory structure and server expectations.

2. Node.js Odd Version Warning

While not critical for development, it hinted at potential instability for production.

  • Switch to an LTS Version of Node.js: I turned to nvm (Node Version Manager) to adopt a more stable, even-numbered LTS version of Node.js, casting:
    nvm install 16 && nvm use 16

    This ensured a foundation of stability and long-term support for my application.

3. Angular Version Compatibility Issue

The most vexing issue arose from a discord between the Angular version (17.3.1) in use and the installed Angular CLI version, leading to compatibility concerns.

  • Update Angular CLI: To mend this rift, I updated both the global and local project’s Angular CLI to versions that resonate with Angular 17, executing:

    npm install -g @angular/cli@latest && npm install @angular/cli@latest

    Utilizing npx ng serve enabled the project’s specific version of Angular CLI to come forth.

  • Follow Angular Update Guide: For a tailored path through this conundrum, I sought guidance from the Angular Update Guide, which provided a map of instructions specific to my journey from current to desired Angular versions.

After Addressing These Concerns

Embarking on npm start once more brought me closer to a seamless application startup. Should you face similar beasts, remember to isolate each problem and apply the fitting solution with precision and care.

Victory Screenshot from task-app

Armed with knowledge and experience from these encounters, I encourage you to face your development challenges with courage and curiosity. Remember, every problem bears a solution, each bug a lesson in disguise.

Database Management

At its core, a database is a systematic collection of data that supports the storage, manipulation, and retrieval of information. Databases can be relational (SQL) or non-relational (NoSQL), each serving different needs based on the structure and scalability requirements of your application.

from Sololearn

Best Practices :

  • Data Sanitization : Always sanitize user inputs to prevent SQL injection attacks. This involves escaping potentially harmful characters before they’re processed by the database.
  • Privilege : Operate your database under the principle of least privilege, meaning users and applications should have only the minimum permissions necessary to perform their tasks.

Secure Requests and Authorization

HTTPS : Use HTTPS (Hypertext Transfer Protocol Secure) for all communications between the client and server. HTTPS encrypts data in transit, preventing attackers from intercepting sensitive information.

Authorization Tokens : Implement token-based authorization, such as JWT (JSON Web Tokens), to manage user sessions. Tokens should be securely stored (in HTTP-only cookies) and validated with each request to verify a user’s identity and permissions.

Click here to display content from YouTube.
Learn more in YouTube’s privacy policy.

Safeguarding Your Environment

Application and server configurations play a significant role in security. A misconfigured server or application can serve as an entry point for attackers.

Secure Configuration Practices:

  • Update Regularly: Keep your server software and dependencies up to date to protect against known vulnerabilities.
  • Minimal Exposure: Disable unnecessary services and features on your server to reduce potential attack surfaces.
  • Environment Variables: Store sensitive configuration options such as API keys and database credentials in environment variables, not in your codebase.

A Shield Against Cross-Site Request Forgery

Cross-Site Request Forgery (CSRF) is an attack that tricks the victim into submitting a malicious request. It exploits the trust that a site has in a user’s browser.

How CSRF Protection Works :

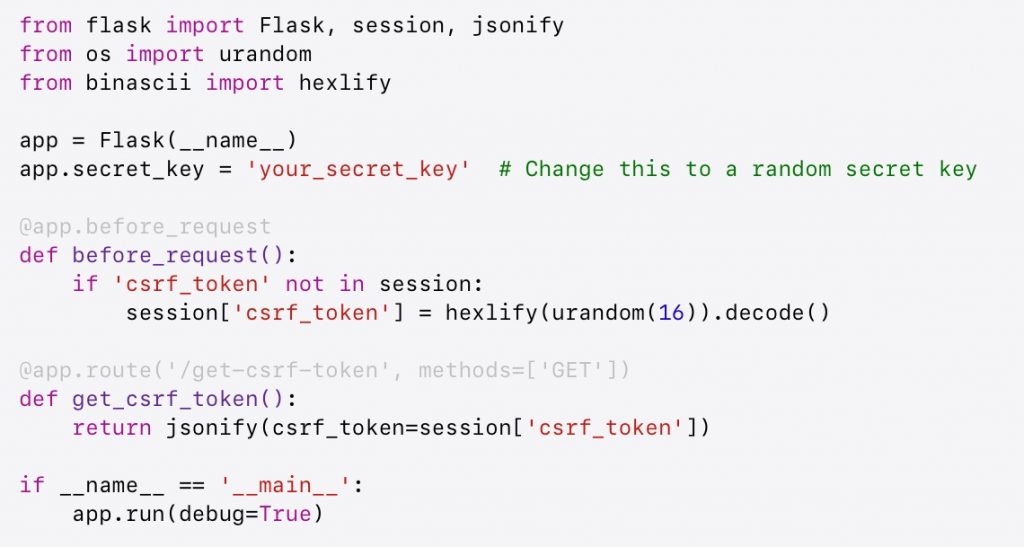
  1. Token Generation : The server generates a unique, unpredictable token and sends it to the client’s browser as part of a form or an AJAX request.
  2. Token Validation : When the client submits the form or makes a request, it must include this token. The server then validates the token before processing the request.
  3. Token Invalidation : Tokens are invalidated after being used or after a certain period, requiring new tokens for subsequent requests.

Implementing CSRF tokens in forms and AJAX requests is a standard practice in modern web frameworks. This mechanism ensures that every state-changing request originates from your application, not an attacker.

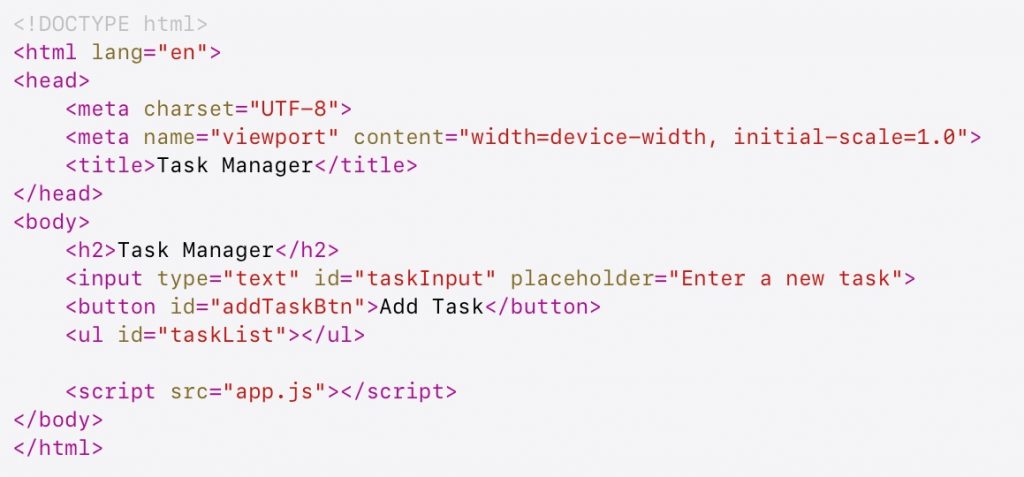
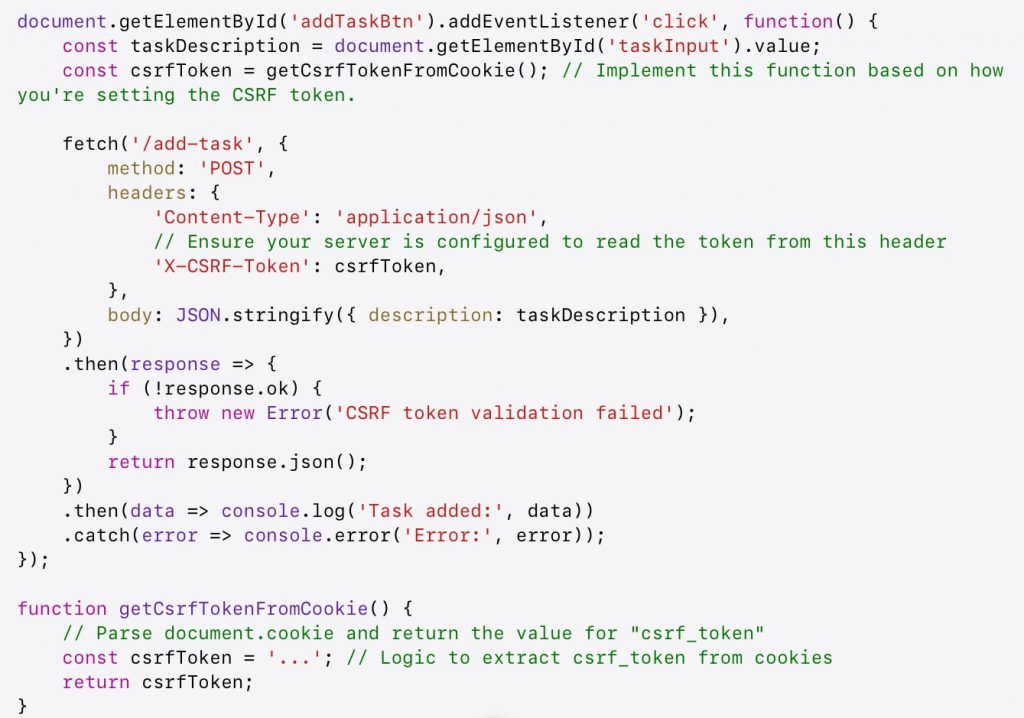
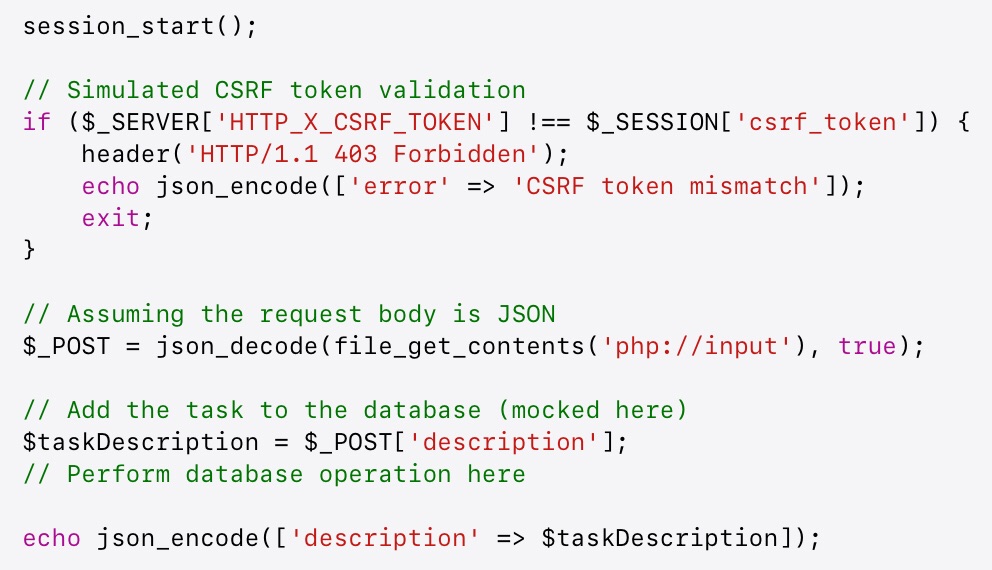
Without Ajax (simplified)

Conclusion : Keeping Data Secure

Remember, security isn’t a one-time task but a continuous process of learning, implementing, and evolving with the digital landscape.

What i need to know. Into a developer road map.

Continue with Python with more advanced topics such as object-oriented programming, data structures, algorithms, and asynchronous programming. Resources like Automate the Boring Stuff with Python and Python.org are excellent places to start.

Click here to display content from YouTube.
Learn more in YouTube’s privacy policy.

Step 1 : Python Skills

Step 2 : Front-End Technologies & librairies

Step 3: Back-End Development

Database Management: A full-stack developer must handle data efficiently. NOSQL (Mongo DB), SQL (SGBDR).

RESTful API Development: APIs are crucial for the communication between front-end and back-end.

Authentication & Security: Understand the importance of securing your applications against common security threats.

Step 4 : DevOps Practices

Version Control with Git: Mastering Git is essential for every developer. Learn how to manage your codebase using version control, collaborate with other developers, and use platforms like GitHub or GitLab.

Continuous Integration/Continuous Deployment (CI/CD): CI/CD pipelines to automate the testing and deployment of your applications. Tools like Jenkins, Travis CI, or GitHub Actions can help streamline these processes.

Step 5 : Building and Deploying a Full-Stack Application

Docker ! How to get started ?

Docker revolutionizes the way developers build, ship, and run applications by using containers. This technology ensures that applications work seamlessly in any environment by packaging them with all their dependencies.

What is Docker ?

Docker is a platform that enables you to create, deploy, and run applications in containers. Containers package an application with all its dependencies into a single unit, ensuring that it runs uniformly across any computing environment. This method significantly reduces the “it works on my machine” syndrome, promoting more reliable development and deployment processes.

Why Use Docker ?

1. Consistency: Docker ensures your application runs the same way in development, testing, and production environments, eliminating discrepancies across different stages of the software lifecycle.

2. Isolation: Containers are isolated from each other and the host system. If one application fails, it doesn’t affect others.

3. Efficiency: Docker enables more efficient use of system resources. Containers share the host system’s kernel and start up significantly faster than traditional virtual machines.

Getting Started with Docker

Installation:
Firstly, install Docker Desktop for Windows or Mac from the official Docker website, or Docker Engine for Linux distributions Docker Engine on Linux.

Building Your First Docker Container:

  1. Create a Dockerfile: This configuration file, named Dockerfile, outlines the steps to create the Docker image.

# Dockerfile for a Python-based application

FROM python:3.8 WORKDIR /app
COPY requirements.txt .
RUN pip install -r requirements.txt
COPY . .
CMD [“python”, “./app.py”]

  1. Build the Container: Execute the command to build your Docker image, substituting my-app with your app’s name.

docker build -t my-app .

  1. Run the Container: Launch your container, making the application available on a specified port.

docker run -p 4000:80 my-app

Docker Compose for Multi-Container Apps

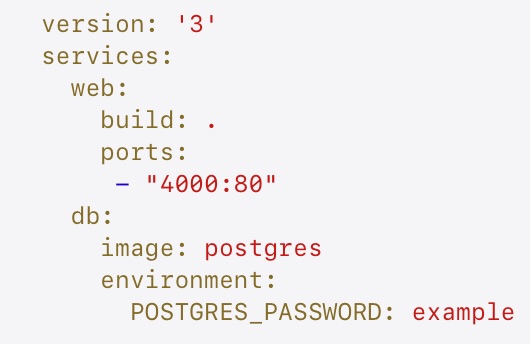
For complex applications requiring multiple services: docker-compose.yml

Execute docker-compose up to start all services.

Use Case : Task App

Users can add, view, and complete tasks with stunning 3D visualizations for task categories using Three.js.

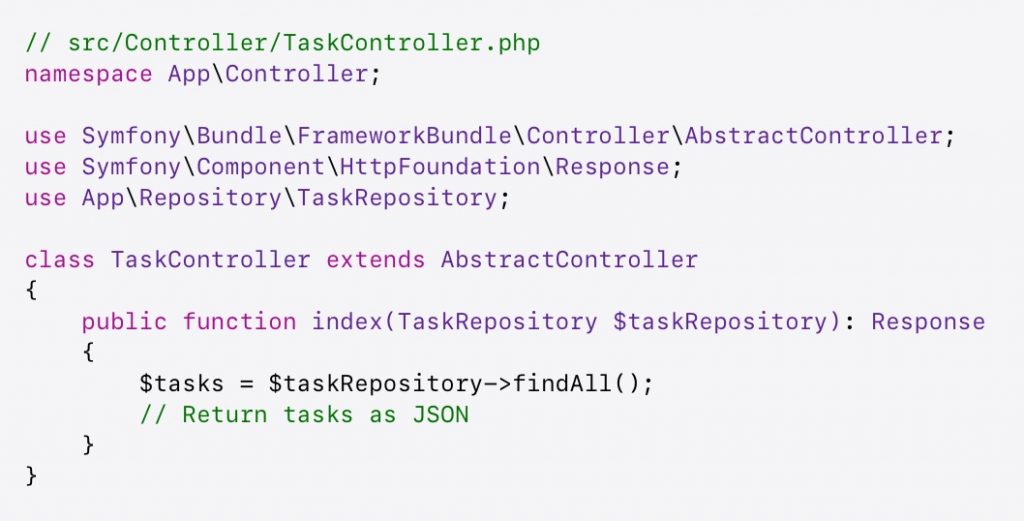
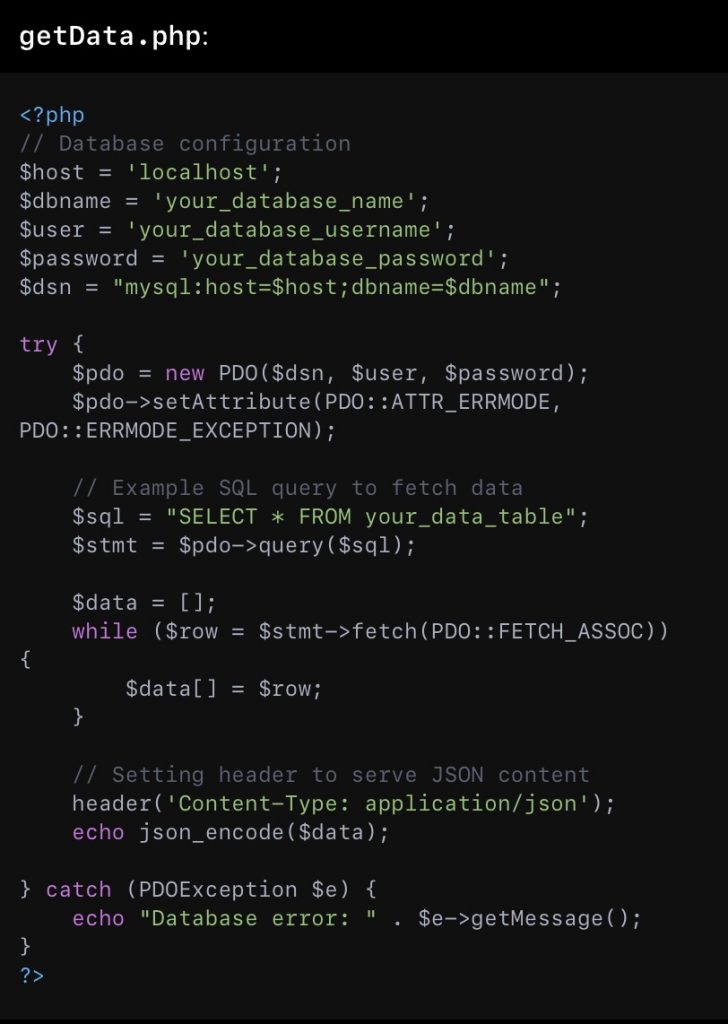
Backend : Choose between Python with Django for a dynamic, robust backend or PHP with Symfony for a modular, enterprise-level application.

  • Django Backend (views.py) :
  • Symfony Backend (TaskController.php) :

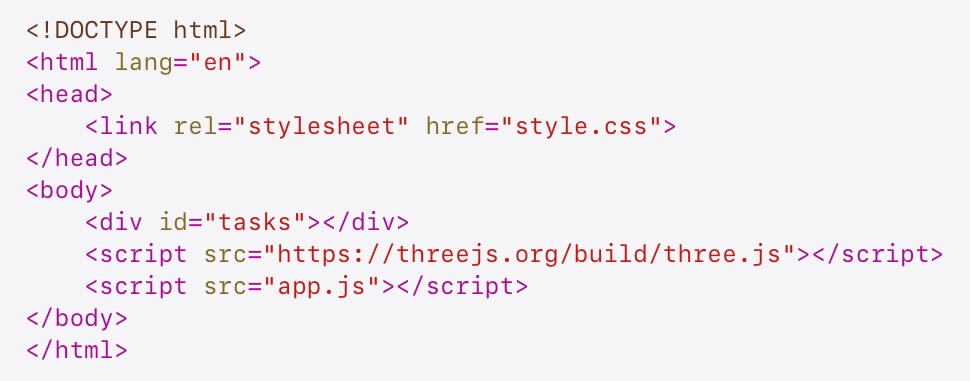
Frontend: Implement the UI with HTML, CSS for styling, and JavaScript for dynamic content loading. Three.js adds 3D visualizations.

  • HTML (index.html) :
  • CSS (style.css) :
  • JavaScript with Three.js (app.js) :

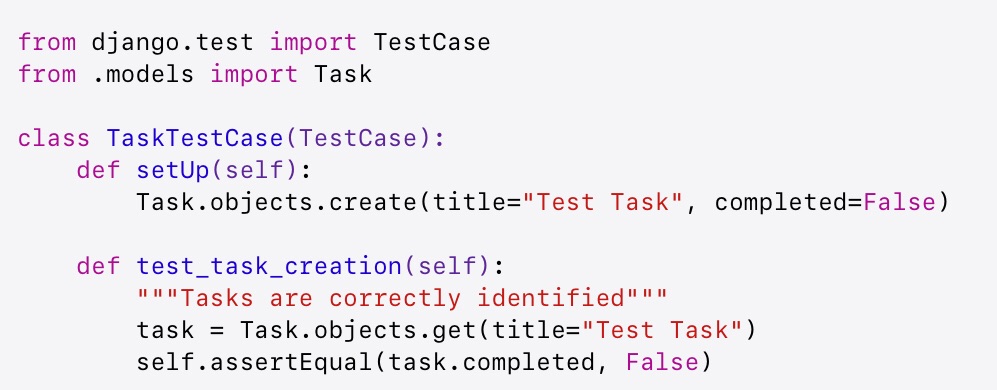
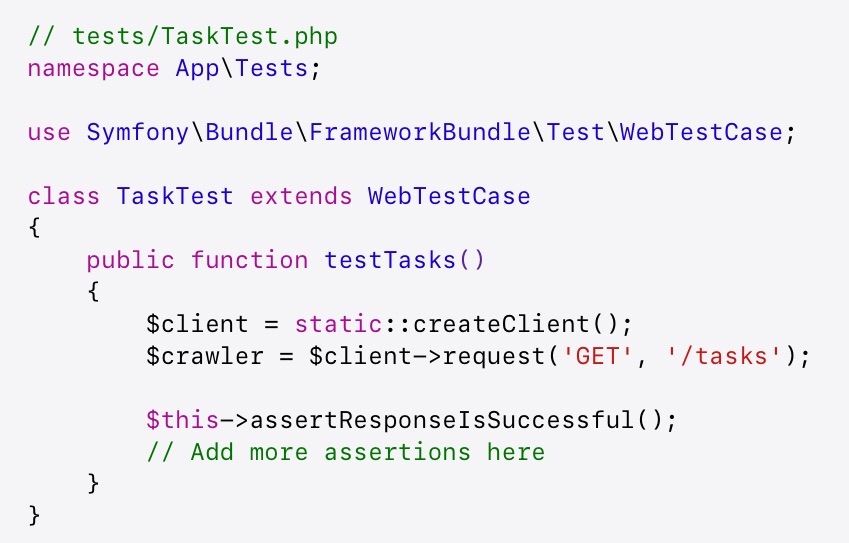
Unit Testing : Ensure functionality with unit tests for both backend choices.

  • Django Test :
  • Symfony Test :

Conclusion

Docker serves as a powerful tool in modern development environments, facilitating consistency across development, testing, and production stages. Our Task App showcases how Docker can be an instrument. To explore more about containerization : Docker’s comprehensive guide.

Journey of a Junior Full-Stack Developer

Elevating “TaskWave” with Three.js and 3D Data Visualization

Hello, fellow developers! I’m Kevin, a junior full-stack developer who initially dove into the coding world through my love for Python. However, the quest for versatility and employability in the tech landscape nudged me towards mastering the full stack—front to back. My journey has led me to share a unique project I’ve been working on: “TaskWave,” a task management application. What sets it apart is not just its functionality but how it incorporates Three.js for stunning 3D data visualizations, offering a fresh perspective on task management.

From Python to Full Stack: The Shift

My programming journey began with Python—a language known for its simplicity and elegance. Python taught me the fundamentals of coding, from data structures to object-oriented programming. However, the diverse demands of the job market made me realize the importance of being a versatile developer. Thus began my foray into the realms of JavaScript, React for the front end, Laravel for the back end, and the fascinating world of 3D visualizations with Three.js.

“TaskWave”: Not Your Ordinary Task Manager

“TaskWave” started as a basic task management tool but evolved into something far more engaging. The standard features are all there: creating tasks, setting deadlines, and categorizing them based on progress. But I wanted “TaskWave” to be more than just checkboxes and lists—I wanted it to visualize tasks in a way that’s both intuitive and captivating.

Incorporating Three.js for 3D Visualizations

Three.js, a JavaScript library for 3D graphics, became the game-changer for “TaskWave.” It allowed me to create dynamic 3D visualizations of tasks, making the app not just functional but also visually stimulating. Imagine viewing your tasks as floating islands in a 3D space, each representing different projects or deadlines, bringing a new dimension to task management.

Getting Started with Three.js in “TaskWave”

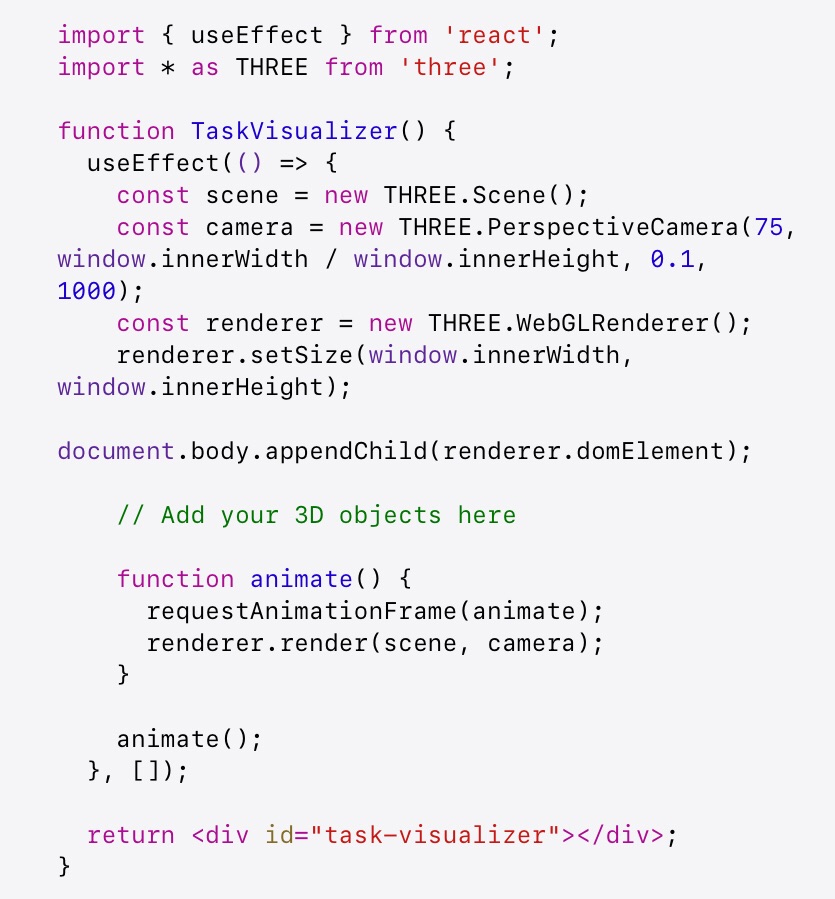
  1. Three.js Setup: First, I integrated Three.js into our React frontend. This involved importing the library and setting up a basic 3D scene:
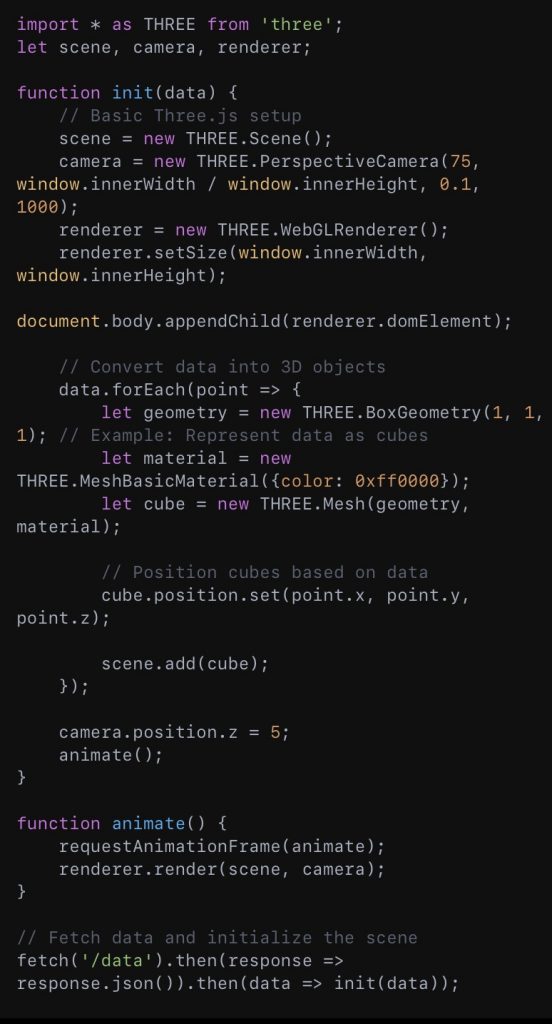
  2. Visualizing Tasks: Each task is represented by a 3D object. For simplicity, let’s start with cubes. The position and color of a cube could represent its priority and status.
  3. Interactive Visualization: I added functionality to interact with these 3D objects. Clicking a cube opens its task details, making “TaskWave” not just visually engaging but also interactive.

Laravel: The Backbone of “TaskWave”

The back end of “TaskWave,” powered by Laravel, manages tasks, user authentication, and serves data to the front end. Laravel’s MVC architecture made it straightforward to organize the application’s logic and data management, ensuring a solid foundation for the app’s functionality.

Embracing Docker for Deployment

Docker came into play for deploying “TaskWave.” It ensured that the app runs smoothly across different environments, encapsulating the application and its dependencies into containers. This was especially helpful for a junior developer like me, making deployment seem less daunting.

Lessons Learned and Moving Forward

“TaskWave” is more than a project; it’s a reflection of my growth as a developer. Transitioning from Python to embracing full-stack development and diving into 3D visualizations with Three.js has been an exhilarating challenge. Here are a few takeaways for fellow junior developers:

  • Be Curious: Don’t shy away from exploring new technologies. Each one opens up new possibilities.
  • Start Small, Dream Big: Begin with simple features and gradually add complexity. “TaskWave” started as a basic app and grew into something much more.
  • Embrace the Learning Curve: Every new library or framework has its learning curve. Tackle it one step at a time.

To juniors like me, ready to code and eager to learn—dive into projects that push your boundaries. Whether it’s integrating 3D visualizations with Three.js or mastering back-end development with Laravel, each project hones your skills and brings you one step closer to becoming a seasoned developer. Let’s continue to learn, code, and transform our ideas into reality. Happy coding!

Crafting a 3D Data Simulation with Laravel and Three.js 🌍✨

MVC, which stands for Model-View-Controller, is a design pattern used in software development to separate the internal representations of information from the ways that information is presented to and accepted from the user. It’s a way to organize your code in a way that separates concerns, making it easier to manage and scale complex applications.

Model

The Model represents the data and the business logic of the application. It is responsible for accessing the database, fetching, storing, and updating data as necessary. Think of it as the heart of your application’s operations, dealing with all the logical parts that handle data.

View

The View is all about presentation. It displays data to the user and sends user commands to the controller. This is where all your UI logic lives. It’s the part of the application that the user interacts with – everything they see on their screen, from buttons to input fields, is part of the View.

Controller

The Controller acts as an intermediary between the Model and the View. It receives user inputs from the View, processes them (with possible updates to the Model), and returns the output display data back to the View. Essentially, it controls the interactions between the Model and the View.

How It Works Together

Imagine you’re using an app to browse a library (books are the data here). You (the user) interact with the webpage (View) by requesting to see the “Fantasy” genre. The webpage sends this request to the Controller, which knows exactly what to do with this action. The Controller fetches the necessary data from the Model, which queries the database for books in the “Fantasy” genre. Once the Model retrieves this data, it sends it back to the Controller, which then chooses the appropriate View for display. Finally, the webpage updates to show you all the books in the “Fantasy” genre.

Laravel: The Data Conductor 🎼

Laravel, with its elegant syntax and powerful MVC architecture, is perfectly suited for handling complex data interactions. It fetches, processes, and serves data, acting as the orchestrator of our digital symphony.

// web.php Route::get('/data', 'DataController@index');

// DataController.php public function index() {

$data = DataModel::all();

// Fetch your data here

return view('dataView', compact('data')); }

This setup efficiently channels data from our database to the frontend, where Three.js awaits to breathe life into it.

Three.js: The Visual Maestro 🎨

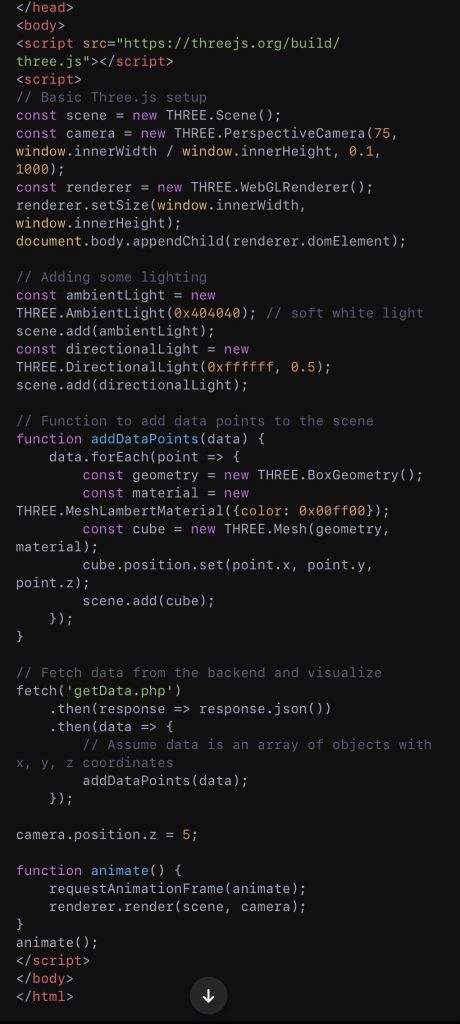
This code snippet showcases how Three.js can transform Laravel-served data into a 3D visual narrative, allowing for an intuitive and immersive data exploration experience.

The Grand Finale: A Symphony of Code 🎻

This narrative, while a guide, is also an invitation—to explore, to create, and to contribute to the evolving landscape of the web. The fusion of Laravel and Three.js not only advances our capabilities in web development but also deepens our connection to the data that shapes our world.

Newer posts »

© 2024 Kvnbbg.fr

Theme by Anders NorénUp ↑

Verified by MonsterInsights