Who loves creating apps.

Category: Uncategorized (Page 4 of 5)

Elevating Web Experiences with Three.js and Laravel

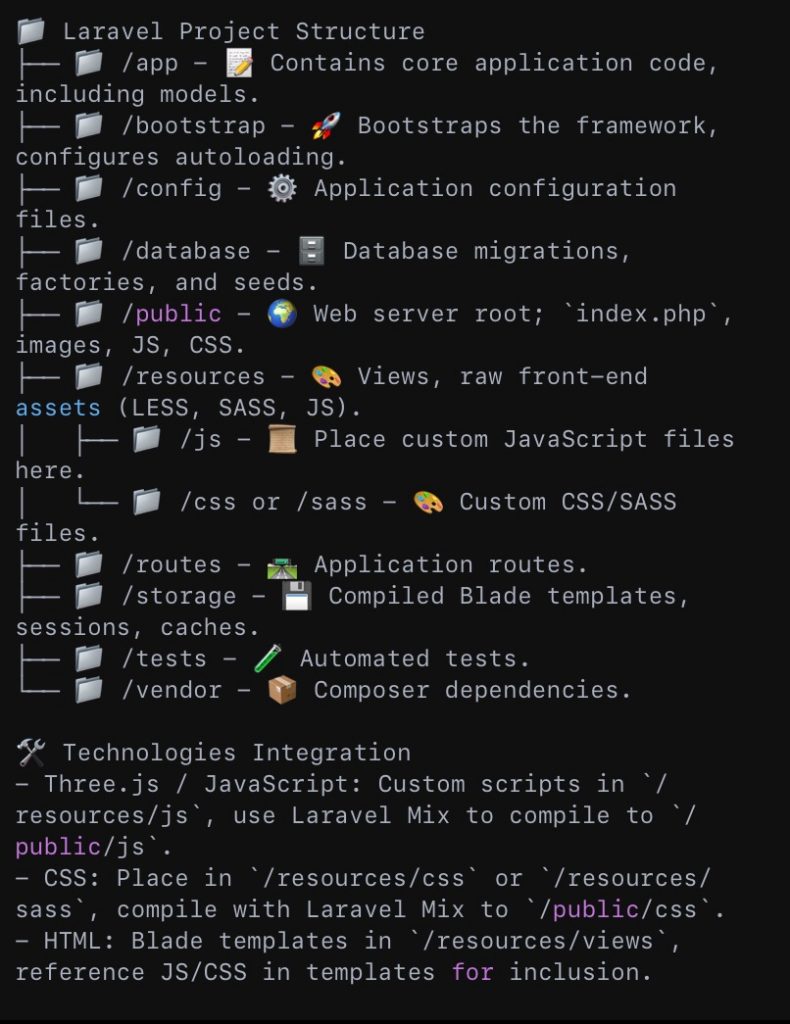
Setting the Stage for Integration

Laravel, a PHP framework, excels in managing application logic and serving data, while Three.js, a JavaScript library, shines in rendering 3D content in the browser using WebGL. To illustrate their potential, we’ll create an application that dynamically generates 3D objects (a cube and a sphere) based on data imported from an Excel file.

Step 1: Preparing Laravel

Start by setting up a new Laravel project and installing the necessary packages for handling Excel files, such as Laravel Excel:composer create-project --prefer-dist laravel/laravel ThreeDLaravelVisualization composer require maatwebsite/excel

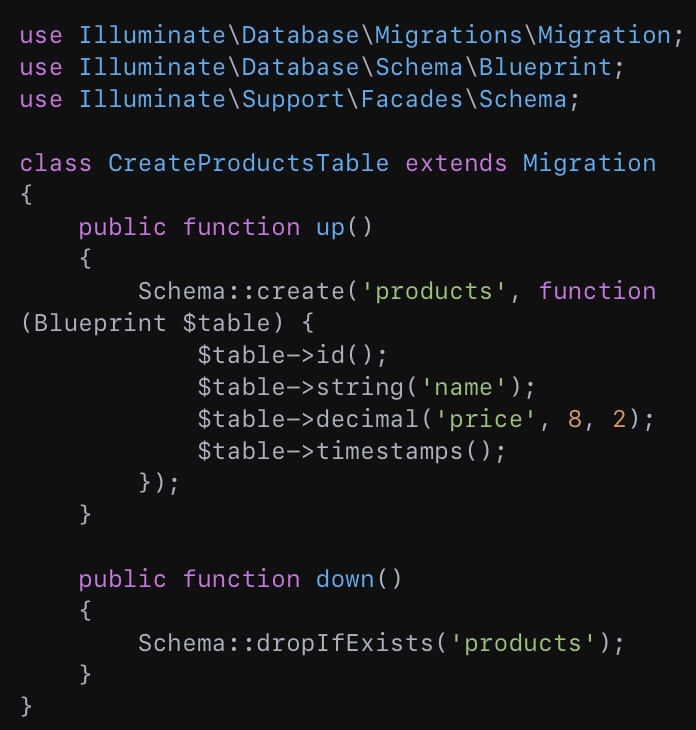
Create a model and migration for storing our Excel data:php artisan make:model DataPoint -m

In the migration file, define the structure of your data points. For simplicity, we’ll include coordinates and a type (cube or sphere):

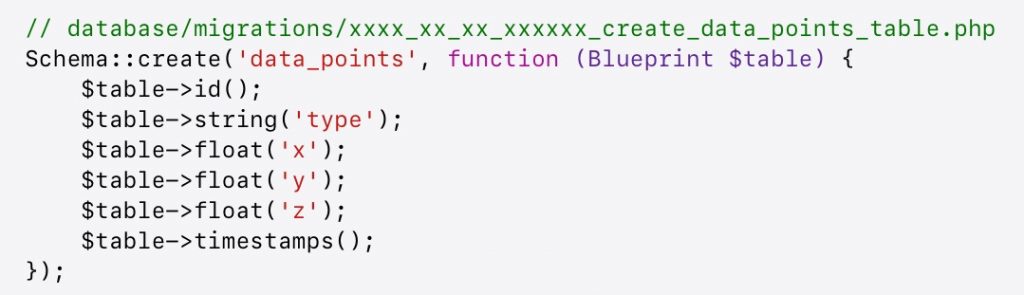
Run the migration:php artisan migrate

Step 2: Importing Data from Excel

Assuming you have an Excel file with data to import, set up Laravel Excel to read the file and populate your data_points table. You might create an import class using Laravel Excel documentation as a guide.

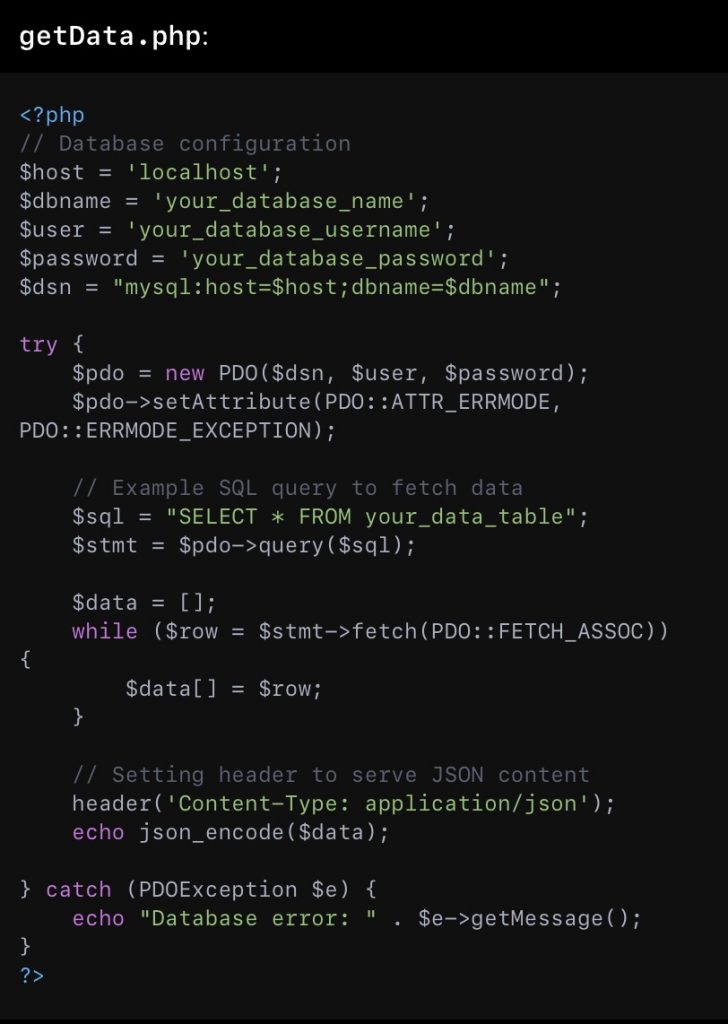
Step 3: Serving Data with Laravel

Create a controller to serve your data to the front end:php artisan make:controller DataController

In DataController, add a method to fetch data points and return them as JSON:

Define a route in routes/web.php:Route::get('/data', 'DataController@index');

Crafting 3D Objects with Three.js

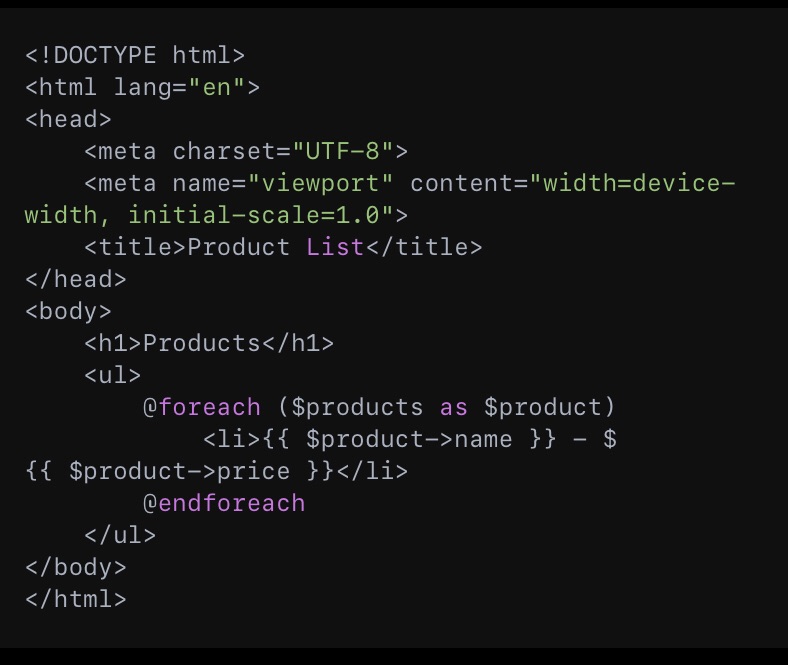
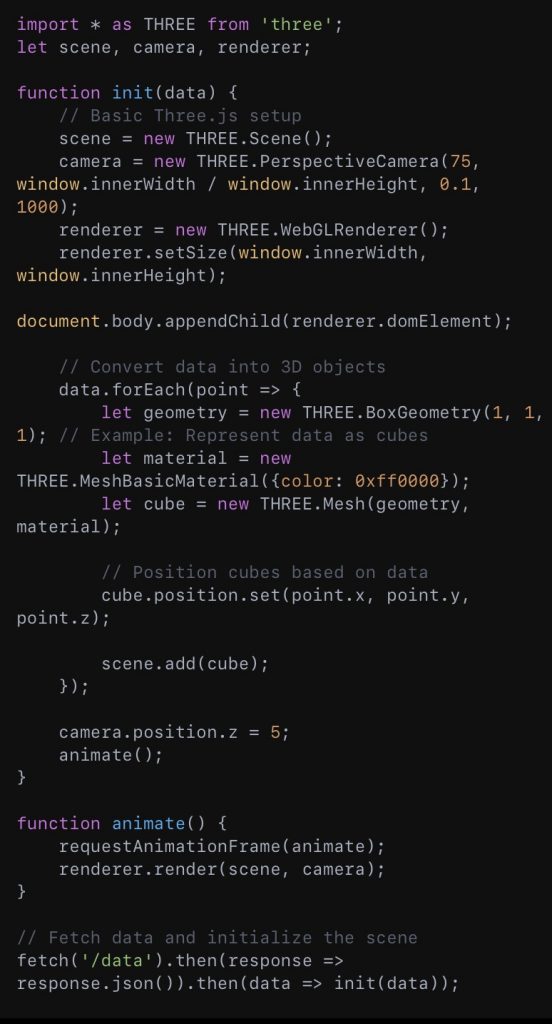
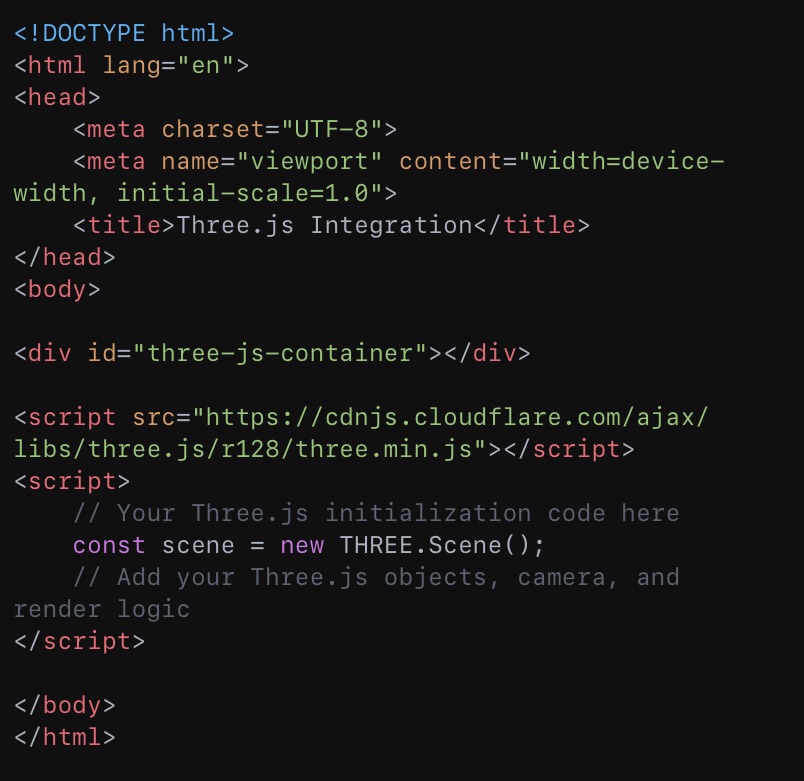
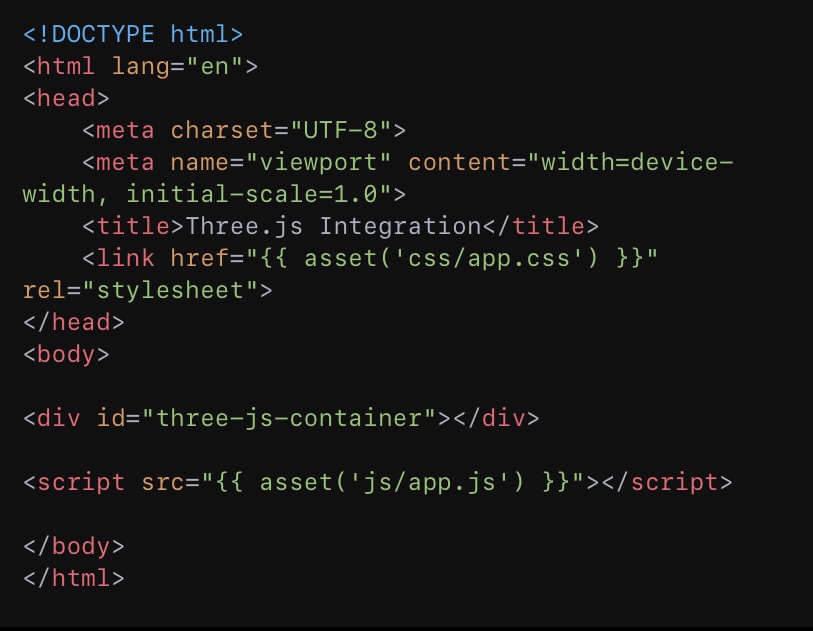
Now, let’s switch to the front end. In your Laravel project’s public directory, create a JavaScript file for your Three.js code, say public/js/threeApp.js. Include this script in your main blade view:<script src="{{ asset('js/threeApp.js') }}"></script>

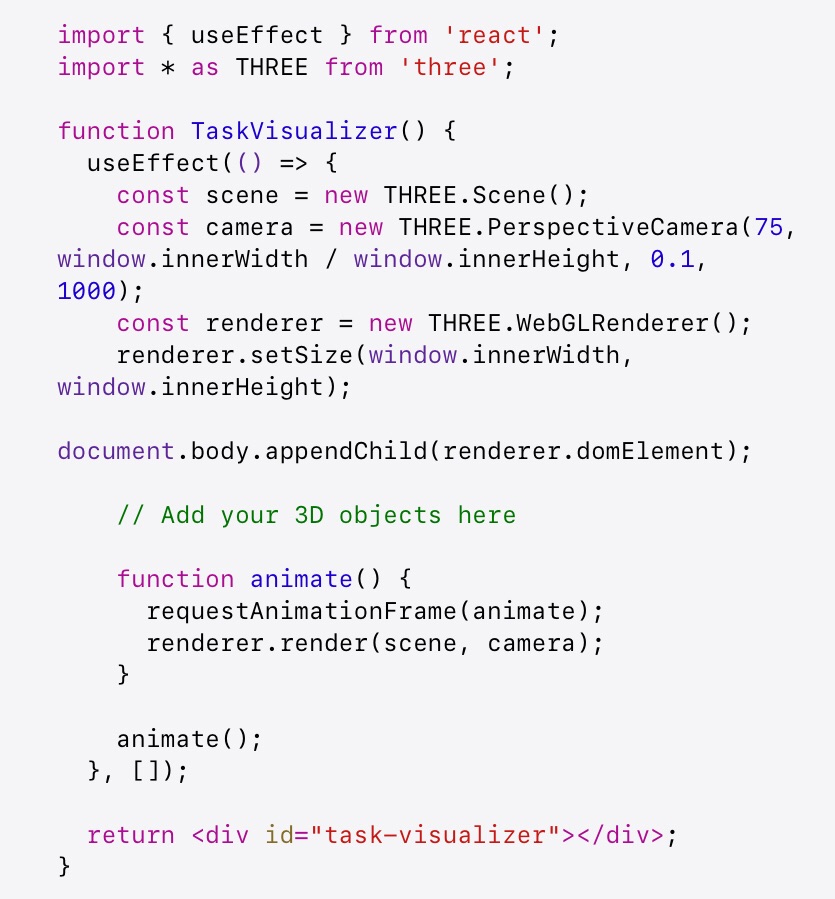
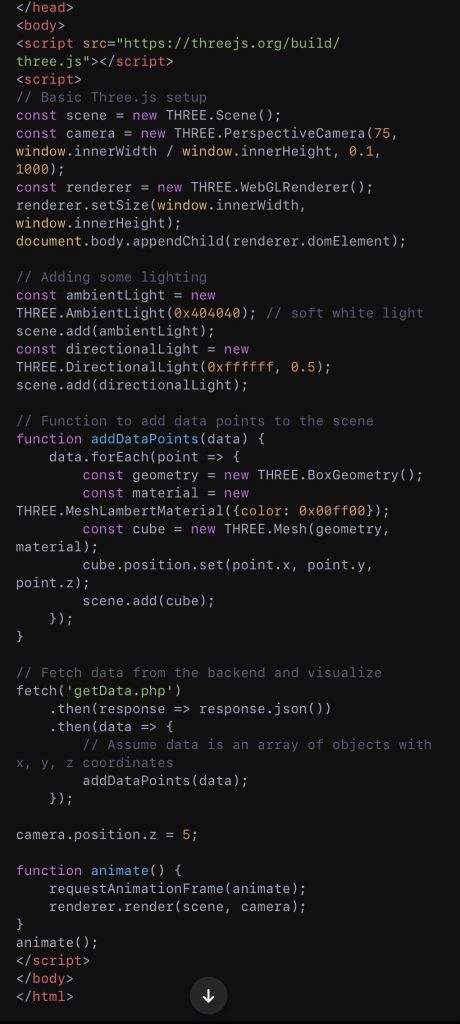
In threeApp.js, initialize Three.js, set up a scene, camera, and renderer. Then, fetch your data from Laravel and create 3D objects accordingly:

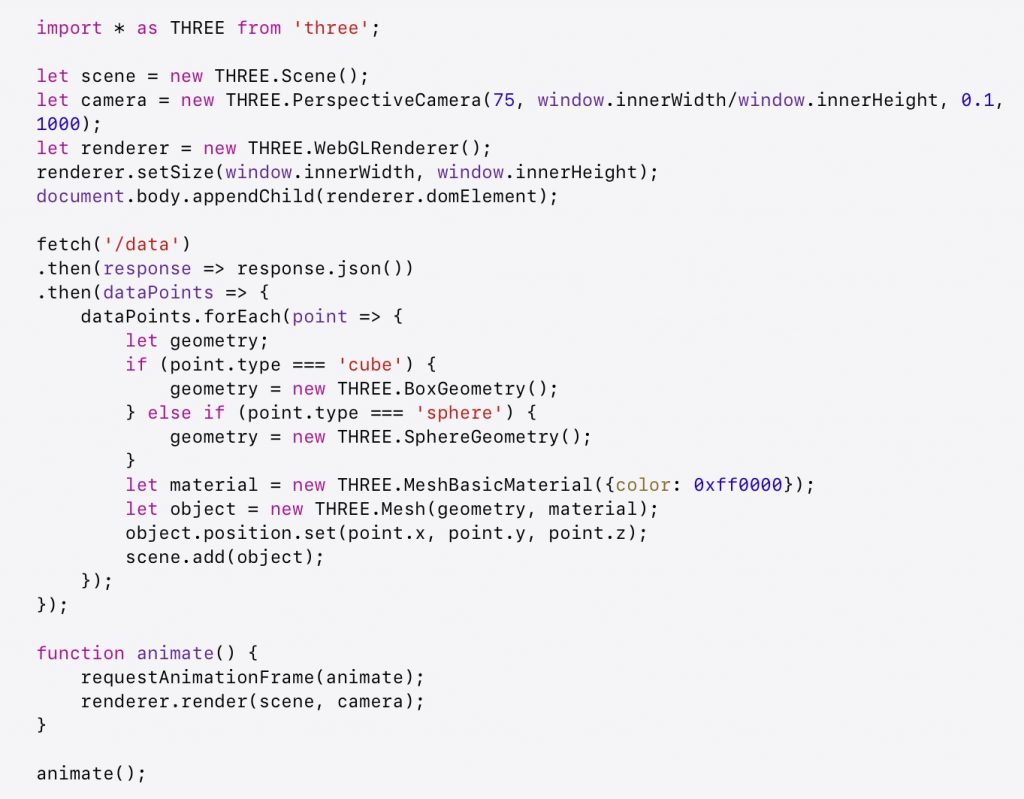
This script fetches data from Laravel, checks the type of each data point, and creates either a cube or a sphere positioned according to the data.

Conclusion

Integrating Laravel and Three.js for dynamic 3D data visualization offers a unique approach to presenting information.

The Power of MVC in Building Modern Web Applications

Laravel, inherently designed around the MVC pattern, simplifies the process of creating well-organized, scalable applications. Let’s apply MVC to our 3D data simulation app:

Step 1: Structuring with MVC in Laravel

  1. Models: We’ll start by defining our data structure. For a 3D data simulation, the model might represent different entities that we want to visualize, such as statistical data points, geographical locations, or any other dataset. // app/Models/DataPoint.php namespace App\Models; use Illuminate\Database\Eloquent\Model; class DataPoint extends Model { protected $fillable = ['x', 'y', 'z', 'value']; // Additional attributes like 'value' can represent the data to be visualized }
  2. Views: The view will be responsible for presenting the 3D visualization to the user. We’ll utilize Three.js within our Laravel views to render the 3D scenes. {{-- resources/views/dataVisualization.blade.php --}} <!DOCTYPE html> <html> <head> <title>3D Data Visualization</title> </head> <body> <div id="threejs-container"></div> <script src="{{ mix('/js/threejsApp.js') }}"></script> {{-- Your Three.js script --}} </body> </html>
  3. Controllers: The controller will handle the logic of fetching data from the Model and passing it to the View. It acts as the intermediary that processes requests and prepares data for visualization. // app/Http/Controllers/DataVisualizationController.php namespace App\Http\Controllers; use App\Models\DataPoint; class DataVisualizationController extends Controller { public function index() { $dataPoints = DataPoint::all(); return view('dataVisualization', compact('dataPoints')); } }

Step 2: Routing and Controllers in Laravel

Laravel makes it straightforward to define routes for your application. We’ll create a route that loads our data visualization page, utilizing the MVC components we’ve set up.// routes/web.php use App\Http\Controllers\DataVisualizationController; Route::get('/visualization', [DataVisualizationController::class, 'index']);

For authentication and other user interactions, Laravel provides an elegant solution with its Auth facade and artisan commands. Setting up authentication routes is as simple as:Auth::routes();

And creating a new controller can be done with:php artisan make:controller YourControllerName

Step 3: Integrating Three.js for 3D Visualization

With the data served by Laravel’s MVC structure, we can use Three.js in our view to render the 3D data visualization. The threejsApp.js script included in our view will contain the Three.js logic to create scenes, cameras, and render our data points in 3D space.

Final Thoughts

This approach illustrates the synergy between server-side frameworks and client-side libraries, showcasing how structured development practices like MVC can significantly enhance the creation of modern, interactive web applications.

Journey of a Junior Full-Stack Developer

Elevating “TaskWave” with Three.js and 3D Data Visualization

Hello, fellow developers! I’m Kevin, a junior full-stack developer who initially dove into the coding world through my love for Python. However, the quest for versatility and employability in the tech landscape nudged me towards mastering the full stack—front to back. My journey has led me to share a unique project I’ve been working on: “TaskWave,” a task management application. What sets it apart is not just its functionality but how it incorporates Three.js for stunning 3D data visualizations, offering a fresh perspective on task management.

From Python to Full Stack: The Shift

My programming journey began with Python—a language known for its simplicity and elegance. Python taught me the fundamentals of coding, from data structures to object-oriented programming. However, the diverse demands of the job market made me realize the importance of being a versatile developer. Thus began my foray into the realms of JavaScript, React for the front end, Laravel for the back end, and the fascinating world of 3D visualizations with Three.js.

“TaskWave”: Not Your Ordinary Task Manager

“TaskWave” started as a basic task management tool but evolved into something far more engaging. The standard features are all there: creating tasks, setting deadlines, and categorizing them based on progress. But I wanted “TaskWave” to be more than just checkboxes and lists—I wanted it to visualize tasks in a way that’s both intuitive and captivating.

Incorporating Three.js for 3D Visualizations

Three.js, a JavaScript library for 3D graphics, became the game-changer for “TaskWave.” It allowed me to create dynamic 3D visualizations of tasks, making the app not just functional but also visually stimulating. Imagine viewing your tasks as floating islands in a 3D space, each representing different projects or deadlines, bringing a new dimension to task management.

Getting Started with Three.js in “TaskWave”

  1. Three.js Setup: First, I integrated Three.js into our React frontend. This involved importing the library and setting up a basic 3D scene:
  2. Visualizing Tasks: Each task is represented by a 3D object. For simplicity, let’s start with cubes. The position and color of a cube could represent its priority and status.
  3. Interactive Visualization: I added functionality to interact with these 3D objects. Clicking a cube opens its task details, making “TaskWave” not just visually engaging but also interactive.

Laravel: The Backbone of “TaskWave”

The back end of “TaskWave,” powered by Laravel, manages tasks, user authentication, and serves data to the front end. Laravel’s MVC architecture made it straightforward to organize the application’s logic and data management, ensuring a solid foundation for the app’s functionality.

Embracing Docker for Deployment

Docker came into play for deploying “TaskWave.” It ensured that the app runs smoothly across different environments, encapsulating the application and its dependencies into containers. This was especially helpful for a junior developer like me, making deployment seem less daunting.

Lessons Learned and Moving Forward

“TaskWave” is more than a project; it’s a reflection of my growth as a developer. Transitioning from Python to embracing full-stack development and diving into 3D visualizations with Three.js has been an exhilarating challenge. Here are a few takeaways for fellow junior developers:

  • Be Curious: Don’t shy away from exploring new technologies. Each one opens up new possibilities.
  • Start Small, Dream Big: Begin with simple features and gradually add complexity. “TaskWave” started as a basic app and grew into something much more.
  • Embrace the Learning Curve: Every new library or framework has its learning curve. Tackle it one step at a time.

To juniors like me, ready to code and eager to learn—dive into projects that push your boundaries. Whether it’s integrating 3D visualizations with Three.js or mastering back-end development with Laravel, each project hones your skills and brings you one step closer to becoming a seasoned developer. Let’s continue to learn, code, and transform our ideas into reality. Happy coding!

Crafting a 3D Data Simulation with Laravel and Three.js 🌍✨

MVC, which stands for Model-View-Controller, is a design pattern used in software development to separate the internal representations of information from the ways that information is presented to and accepted from the user. It’s a way to organize your code in a way that separates concerns, making it easier to manage and scale complex applications.

Model

The Model represents the data and the business logic of the application. It is responsible for accessing the database, fetching, storing, and updating data as necessary. Think of it as the heart of your application’s operations, dealing with all the logical parts that handle data.

View

The View is all about presentation. It displays data to the user and sends user commands to the controller. This is where all your UI logic lives. It’s the part of the application that the user interacts with – everything they see on their screen, from buttons to input fields, is part of the View.

Controller

The Controller acts as an intermediary between the Model and the View. It receives user inputs from the View, processes them (with possible updates to the Model), and returns the output display data back to the View. Essentially, it controls the interactions between the Model and the View.

How It Works Together

Imagine you’re using an app to browse a library (books are the data here). You (the user) interact with the webpage (View) by requesting to see the “Fantasy” genre. The webpage sends this request to the Controller, which knows exactly what to do with this action. The Controller fetches the necessary data from the Model, which queries the database for books in the “Fantasy” genre. Once the Model retrieves this data, it sends it back to the Controller, which then chooses the appropriate View for display. Finally, the webpage updates to show you all the books in the “Fantasy” genre.

Laravel: The Data Conductor 🎼

Laravel, with its elegant syntax and powerful MVC architecture, is perfectly suited for handling complex data interactions. It fetches, processes, and serves data, acting as the orchestrator of our digital symphony.

// web.php Route::get('/data', 'DataController@index');

// DataController.php public function index() {

$data = DataModel::all();

// Fetch your data here

return view('dataView', compact('data')); }

This setup efficiently channels data from our database to the frontend, where Three.js awaits to breathe life into it.

Three.js: The Visual Maestro 🎨

This code snippet showcases how Three.js can transform Laravel-served data into a 3D visual narrative, allowing for an intuitive and immersive data exploration experience.

The Grand Finale: A Symphony of Code 🎻

This narrative, while a guide, is also an invitation—to explore, to create, and to contribute to the evolving landscape of the web. The fusion of Laravel and Three.js not only advances our capabilities in web development but also deepens our connection to the data that shapes our world.

The Morning Ritual: Preparing for Battle 🌅

With a steaming cup of coffee by my side and Visual Studio Code open at 8a.m, I’m ready to conquer the day. My strategy? The Pomodoro Technique: 45 minutes of uninterrupted coding, followed by a 15-minute break. This rhythm, accompanied by Python podcasts and ambient music, keeps my mind sharp and my creativity flowing.

Setting the Stage with Laravel and Three.js

Laravel, a PHP framework known for its elegance and simplicity, forms the backbone of my project. Its robust features, such as routing, security, and templating, make it an ideal candidate for building the API. Meanwhile, Three.js stands ready to breathe life into the web fonts in vibrant 3D.

# Installing Laravel

composer create-project --prefer-dist laravel/laravel fontRevolution

# Adding Three.js via npm

cd fontRevolution npm install three

Crafting the API with Laravel

// routes/api.php

Route::get('/fonts', 'FontController@index');

// app/Http/Controllers/FontController.php

public function index() {

return response()->json([ 'fonts' => Font::all()->transform(function($font) {

return ['name' => $font->name, 'url' => $font->url];

}) ]);

}

Bringing Fonts to Life with Three.js

import * as THREE from 'three';

let camera, scene, renderer, fontMesh;

init();

animate();

function init() {

// Scene setup...

camera = new THREE.PerspectiveCamera(75, window.innerWidth / window.innerHeight, 1, 5000);

scene = new THREE.Scene();

renderer = new THREE.WebGLRenderer(); renderer.setSize(window.innerWidth, window.innerHeight); document.body.appendChild(renderer.domElement); // Load a font and create 3D text...

const loader = new THREE.FontLoader();

loader.load('path/to/font.json', function (font) {

const geometry = new THREE.TextGeometry('Hello World!', {

font: font, size: 80, height: 5, curveSegments: 12,

});

const material = new THREE.MeshBasicMaterial({ color: 0xf3f3f3 }); fontMesh = new THREE.Mesh(geometry, material); scene.add(fontMesh);

});

} function animate() { requestAnimationFrame(animate); // Animations go here...

fontMesh.rotation.x += 0.01; fontMesh.rotation.y += 0.01; renderer.render(scene, camera); }

This example demonstrates the basics of creating 3D text with Three.js and adding it to our scene. The text animates continuously, showcasing the potential of dynamic web fonts.

Sustainability Through Support 🌍

After hours of coding, I ponder the sustainability of my project. To maintain the servers and hosting without resorting to intrusive ads, I decide to incorporate a donation link to my Ko-fi page. This way, supporters can fuel the project directly, ensuring its longevity and impact.

<!-- Add a Ko-fi donation button -->

<a href="https://ko-fi.com/kvnbbg" target="_blank">Support the project on Ko-fi!</a>

Laravel & Three.js

Three.js is a powerful JavaScript library and API used to create and display animated 3D graphics in a web browser using WebGL. It’s a tool that complements the front-end ecosystem, allowing developers to integrate sophisticated 3D visualizations directly into their web applications.

Enhancing Web Experiences with Three.js

Let’s extend our discussion by exploring how to integrate a simple Three.js scene into a web application. This example will create a rotating 3D cube within a Laravel application, illustrating the seamless connection between server-side management and client-side innovation.

Setting Up

Before we dive into the code, ensure you have Node.js installed to manage packages like Three.js. For Laravel, Composer and PHP should be set up in your environment.

  1. Install Three.js: In your Laravel project’s root directory, use npm to install Three.js:

npm install three

  1. Add Three.js to Your Laravel Project: After installation, you can include Three.js in your project by importing it into the resource file where you’ll be creating your scene, typically a JavaScript file located in resources/js/app.js or a similar custom script file that you include in your Laravel mix compilation.

Example: Creating a Rotating Cube with Three.js

Here is how you can create a simple rotating 3D cube using Three.js, which you can include in one of your Laravel views.

<!DOCTYPE html>

<html>

<head>

<title>3D Cube Example</title>

<style> body { margin: 0; } canvas { display: block; } </style>

</head>

<body>

<script src="/js/app.js"></script>

<!-- Ensure this path points to your compiled JS containing Three.js code -->

<script>

import * as THREE from 'three';

let scene, camera, renderer, cube;

function init() {

// Scene setup

scene = new THREE.Scene();

scene.background = new THREE.Color(0xdddddd);

// Camera setup

camera = new THREE.PerspectiveCamera(75, window.innerWidth / window.innerHeight, 0.1, 1000);

camera.position.z = 5;

// Renderer setup

renderer = new THREE.WebGLRenderer({antialias: true}); renderer.setSize(window.innerWidth, window.innerHeight); document.body.appendChild(renderer.domElement);

// Cube setup

const geometry = new THREE.BoxGeometry();

const material = new THREE.MeshBasicMaterial({ color: 0x00ff00 }); cube = new THREE.Mesh(geometry, material);

scene.add(cube);

animate();

}

function animate() {

requestAnimationFrame(animate); // Rotate cube

cube.rotation.x += 0.01;

cube.rotation.y += 0.01;

renderer.render(scene, camera);

}

init();

</script>

</body> </html>

In this example, we initialize a Three.js scene, create a camera and a renderer, and then create a cube with a simple geometry and material. We add the cube to our scene and create an animate function that updates the cube’s rotation before rendering the scene again, creating a continuous animation.

Conclusion

To incorporate this into a Laravel view, you can place the script within a Blade template or reference it externally from your public JavaScript assets compiled by Laravel Mix.

Integrating Front-end and Back-end

In the evolving landscape of web development, the line between front-end and back-end technologies is increasingly blurred.

PHP and Laravel: The Back-end Powerhouse

PHP has been a cornerstone of server-side web development for decades, offering simplicity, flexibility, and a vast ecosystem. Laravel, built on PHP, elevates this foundation with elegant syntax, robust features, and a thriving community. It’s designed to facilitate common tasks such as routing, sessions, caching, and authentication, making web development faster and more enjoyable.

Artisan: The Laravel Craftsman

A key feature of Laravel is Artisan, a command-line interface that automates many aspects of web development. From database migrations to model creation, Artisan commands streamline development workflows, enabling developers to focus on building features rather than managing infrastructure.

Bridging the Front-end and Back-end with Laravel

Laravel doesn’t stop at the back-end. With tools like Blade, Laravel’s templating engine, it bridges the gap to the front-end, allowing developers to seamlessly integrate server-side logic with client-side presentation.

Vue.js: A Reactive Partnership

While Laravel is server-side, it pairs exceptionally well with front-end frameworks like Vue.js. This synergy allows developers to build reactive components that enhance user experience, creating single-page applications (SPAs) with ease. Laravel’s mix tooling system simplifies the use of Vue.js, enabling efficient asset compilation and management.

jQuery and Bootstrap: Enhancing User Interactions

For projects requiring quick development or those with a preference for jQuery, Laravel accommodates seamless integration. jQuery enhances client-side scripting, offering a straightforward way to manipulate the DOM, handle events, and make AJAX requests. When combined with Bootstrap, a front-end framework, developers can rapidly prototype and build responsive web designs.

Swift: Bringing Laravel to Mobile

In the realm of mobile development, Swift for iOS offers an interesting crossroad. While not directly related to PHP or Laravel, Swift developers can consume Laravel-powered APIs to bring robust web application functionalities to mobile platforms, creating a cohesive ecosystem between web and mobile applications.

Laravel Documentation: A Gateway to Mastery

One of Laravel’s greatest assets is its comprehensive and well-structured documentation. It serves as a gateway for developers to delve into Laravel’s features, from beginner topics to advanced usage. The documentation is a testament to Laravel’s commitment to developer education and community support.

React and Laravel: A Modern Web Duo

React, a JavaScript library for building user interfaces, is another front-end technology that pairs well with Laravel. Utilizing React components within a Laravel application enables developers to create highly interactive and dynamic user experiences. Laravel’s API resources make it straightforward to build a RESTful API that React components can interact with, bridging the server-client gap effectively.

Conclusion

The web development landscape is rich and varied, with PHP and Laravel standing as testament to the power and flexibility of server-side programming. By leveraging Artisan, integrating with front-end technologies like jQuery, Bootstrap, Vue.js, and React, and utilizing the comprehensive Laravel documentation, developers are equipped to craft sophisticated web applications that are both robust and user-friendly.

Unveiling PHP and Laravel

A Comprehensive Guide for Modern Web Development

In the evolving landscape of web development, PHP has long stood as a foundational language, powering a significant portion of the internet. Enter Laravel, a PHP framework known for its elegant syntax, robust features, and ability to facilitate rapid application development. This article explores the use case scenarios for Laravel, guides you through its installation on a Linux system, and provides a bug-free script example.

Laravel: The PHP Framework for Web Artisans

Laravel is designed to make web development tasks simpler and more efficient. It achieves this through expressive syntax, its template engine (Blade), ORM (Eloquent), and comprehensive ecosystem including tools like Artisan, Laravel Mix, and various packages for development tasks.

Use Cases for Laravel:

  • Enterprise Applications: Laravel’s robustness makes it suitable for large-scale applications, offering advanced security features, efficient database management, and scalable architecture.
  • Content Management Systems (CMS): Though WordPress dominates this space, Laravel allows developers to build customized CMS tailored to specific needs.
  • E-commerce Platforms: With packages like Aimeos, Laravel is an excellent choice for crafting comprehensive e-commerce solutions.
  • APIs for Mobile Applications: Laravel’s ability to serve as a backend API makes it a prime candidate for mobile app development.

Installing Laravel on Linux

Before diving into the code, ensure you have PHP (7.3 or higher), Composer (PHP’s package manager), and a database (MySQL, PostgreSQL) installed. Follow these steps to install Laravel:

  1. Install Composer:

curl -sS https://getcomposer.org/installer | php sudo mv composer.phar /usr/local/bin/composer

  1. Install Laravel via Composer:

composer create-project --prefer-dist laravel/laravel myLaravelApp

  1. Set Up Environment:

Navigate to your project folder and configure your .env file to match your database and environment settings.

  1. Serve the Application:

php artisan serve

This command launches a development server. Your Laravel application is now accessible at http://localhost:8000.

Crafting an Authentication System

Laravel simplifies authentication through its built-in features. Use the following Artisan command to scaffold basic login and registration views:php artisan ui vue --auth

This command sets up the necessary views and backend logic for authentication.

Note: As of Laravel 8, you might need to use Laravel Breeze or Jetstream for a more comprehensive authentication system, including two-factor authentication and API support.

Example Script: Managing SQL Data with Eloquent

Eloquent ORM allows for elegant syntax when interacting with the database. Here’s a simple example:<?php use App\Models\User; // Retrieve a user by ID $user = User::find(1); // Update the user's name $user->name = 'Jane Doe'; $user->save();

This script demonstrates fetching and updating data, showcasing Laravel’s straightforward and bug-free approach to database management.

Building the Views

Laravel utilizes the Blade templating engine, enabling you to craft dynamic HTML templates easily. Here’s a basic structure for login.blade.php, register.blade.php, and dashboard.blade.php views within the resources/views directory:

  • Login View (login.blade.php):

{{-- Extend your main layout --}} @extends('layouts.app') @section('content') {{-- Login form here --}} @endsection

  • Register View (register.blade.php):

Similar to the login view, include form fields for user registration details.

  • Dashboard View (dashboard.blade.php):

This view might display user-specific data post-login, providing a personalized experience.

Conclusion

Laravel empowers developers to build sophisticated web applications with PHP, streamlining tasks from authentication to database management. By following the outlined steps to install Laravel, leverage its authentication scaffolding, and manage SQL data elegantly, developers can create secure, efficient, and user-friendly web platforms.

Integrating Vue.js with PHP in VS Code and Creating a Simple API

Setting Up Vue.js with PHP in VS Code

1. Setting Up PHP:
Ensure you have PHP installed on your system and set up a local server environment (e.g., XAMPP, MAMP, or WAMP).

2. Installing Vue CLI:
Vue CLI is a command-line tool for Vue.js development. Install it globally using npm:npm install -g @vue/cli

3. Creating a Vue Project:
Navigate to your project directory and create a new Vue project:vue create my-vue-app

Choose the default preset or customize your setup as required.

4. Integrating PHP:
Within the same project directory, create a folder for your PHP scripts, e.g., api. This is where you’ll store PHP files, like your API endpoints.

5. Configuring Vue.js to Proxy API Requests:
To integrate your Vue.js app with PHP running on a local server, configure a proxy in your Vue.js app’s vue.config.js file:module.exports = { devServer: { proxy: 'http://localhost:your_php_server_port', }, }

This setup allows you to make API requests to your PHP server from your Vue.js application during development.

Crafting a Simple PHP API

Create a PHP file inside your api directory. This example demonstrates a simple API that returns book details.

api/books.php:<?php header('Content-Type: application/json'); class Book { public $title; public $author; public $pages; public function __construct($title, $author, $pages) { $this->title = $title; $this->author = $author; $this->pages = $pages; } } // Sample book $book1 = new Book('Lord of the Rings', 'J.R.R. Tolkien', 1178); echo json_encode($book1);

This script defines a Book class with a constructor to initialize book objects. When books.php is accessed, it instantiates a Book object and returns its details in JSON format.

Object-Oriented PHP: Constructors and Instances

In PHP, constructors are special methods invoked at the creation of an object. They are ideal for initializing an object’s properties. The __construct method in the Book class demonstrates how PHP allows you to set up objects with different titles, authors, and page numbers.

Usage:

When you create a new instance of the Book class:$book2 = new Book('Lord of the Rings', 'J.R.R. Tolkien', 1178);

You’re calling the constructor method, which sets the title, author, and pages of the book2 object. This approach highlights PHP’s beautiful syntax for managing object-oriented programming, making code more readable and maintainable.

Conclusion

Combining Vue.js with PHP in VS Code for front-end and API development respectively, offers a powerful toolkit for creating dynamic web applications. The setup process involves configuring Vue.js to work alongside a PHP backend, facilitating seamless development and testing. Additionally, employing object-oriented programming practices in PHP, like using constructors for object initialization, further enhances the application’s structure and efficiency. This blend of technologies and programming paradigms enables developers to craft responsive, data-driven web experiences.

Mastering phpMyAdmin

Managing Databases

In the realm of web development, efficient database management is crucial. phpMyAdmin, a free and open-source administration tool for MySQL and MariaDB, stands out as a pivotal resource for developers.

Understanding phpMyAdmin

phpMyAdmin is a web-based application that provides a user-friendly interface for handling the administration of MySQL databases. It allows users to perform a variety of database tasks including creating, modifying, and deleting databases and tables; executing SQL statements; managing users and permissions; and importing and exporting data, all through a web browser.

The Algorithm for a Luxury Bag in phpMyAdmin

Imagine managing an inventory of luxury bags with varying qualities and values. Here’s how you might use phpMyAdmin to maintain this data:

  1. Creating the Database:
    First, log into phpMyAdmin and create a new database for our e-commerce platform, luxury_bags.
  2. Defining the Tables:
    Within the luxury_bags database, create a table called bags with fields for id, name, quality, and value. The id will be an auto-incrementing primary key.
  3. Inserting Data:
    Use phpMyAdmin’s insert functionality to add records for each bag. For example, a record might include a name like “Vintage Chanel”, a quality rating, and its current market value.
  4. Updating Bag Values:
    Over time, as bags appreciate in value, use phpMyAdmin’s update functionality to adjust the value field. This can be done manually or through SQL queries.

Integrating PHP with JavaScript

In a dynamic e-commerce platform, PHP might handle server-side logic and database interactions, while JavaScript enhances the front-end with interactivity. For instance, PHP can fetch the current inventory of luxury bags from the database, and JavaScript can then dynamically display this data on the website, updating the UI without needing to refresh the page.

Example:
PHP fetches bag data and encodes it as JSON:

<?php

// PHP code to query the 'bags' table and fetch all records

echo json_encode($bagsData);

?>

JavaScript fetches this data and updates the web page dynamically:

fetch('getBagsData.php') .then(response => response.json()) .then(data => {

// Use JavaScript to dynamically display bag data on the page

});

or

PHP Functions in WordPress

WordPress, a content management system written in PHP, heavily relies on functions to extend its functionality. Themes and plugins use WordPress’s hooks and APIs to add custom features or modify existing ones.

Example:
To customize how posts are displayed, a WordPress theme might use the add_action() function to hook into the the_content action hook:

function customize_post_display($content) {

// Modify post content here

return $content;

}

add_action('the_content', 'customize_post_display');

This PHP function alters the content of posts, demonstrating the tight integration between PHP and WordPress functionality.

Conclusion

phpMyAdmin serves as a bridge between the technical database management tasks and the user-friendly web interface, facilitating the efficient management of data for web applications like a luxury bag e-commerce platform. The symbiotic relationship between PHP and JavaScript enables the creation of dynamic, user-engaging web applications, while the use of PHP functions within WordPress underscores the flexibility and power of PHP in web development contexts.

« Older posts Newer posts »

© 2024 Kvnbbg.fr

Theme by Anders NorénUp ↑

Verified by MonsterInsights