Who loves creating apps.

Category: Uncategorized (Page 3 of 5)

Angular and much more

Angular’s evolution has taken the development world by storm, beginning with its significant announcement at the ng-Europe conference back in October 2014. Since then, it has become a cornerstone for developing robust and dynamic web applications. This article guides you through setting up a new Angular project named “Task,” emphasizing the creation of a comprehensive task management application.

The Beginning 🚀

The journey into Angular begins with the Angular CLI, a powerful toolset for initializing, developing, and maintaining Angular applications. To kickstart your project:

  1. Angular CLI Installation:
    • Ensure you have Node.js installed, then proceed with Angular CLI installation using npm:
    • npm install -g @angular/cli
  2. Project Initialization:
    • Create a new Angular project “Task” with routing enabled and SCSS for styles:
    • ng new Task --routing=true --style=scss
  3. Component Generation:
    • Generate essential components for managing tasks:
    • ng generate component Tasks
    • ng generate component TaskDetail
    • ng generate component AddTask
  4. Routing Setup:
    • Configure routing in app-routing.module.ts to navigate between components seamlessly:
    • import { NgModule } from '@angular/core';
    • import { RouterModule, Routes } from '@angular/router';
    • import { TasksComponent } from './tasks/tasks.component';
    • import { TaskDetailComponent } from './task-detail/task-detail.component';
    • import { AddTaskComponent } from './add-task/add-task.component';
    • const routes: Routes = [
    • { path: 'tasks', component: TasksComponent },
    • { path: 'task/:id', component: TaskDetailComponent },
    • { path: 'add-task', component: AddTaskComponent },
    • { path: '', redirectTo: '/tasks', pathMatch: 'full' },
    • ];
    • @NgModule({
    • imports: [RouterModule.forRoot(routes)],
    • exports: [RouterModule]
    • })
    • export class AppRoutingModule { }
  5. Backend Integration:
    • Implement TaskService to perform CRUD operations against a backend API:
    • import { Injectable } from '@angular/core';
    • import { HttpClient } from '@angular/common/http';
    • import { Observable } from 'rxjs';
    • import { Task } from './task';
    • @Injectable({
    • providedIn: 'root'
    • })
    • export class TaskService {
    • private apiUrl = 'http://yourapi/tasks';
    • constructor(private http: HttpClient) { }
    • getTasks(): Observable {
       return this.http.get(this.apiUrl);
      }
      
      getTask(id: number): Observable {
       return this.http.get(${this.apiUrl}/${id});
      }
      
      addTask(task: Task): Observable {
       return this.http.post(this.apiUrl, task);
      }
      
      updateTask(task: Task): Observable {
       return this.http.put(${this.apiUrl}/${task.id}, task);
      }
      
      deleteTask(id: number): Observable {
       return this.http.delete(${this.apiUrl}/${id});
      }
      }
  6. Frontend Interaction:
    • Utilize TaskService in TasksComponent to interact with the backend and display tasks:
    • import { Component, OnInit } from '@angular/core';
    • import { TaskService } from '../task.service';
    • import { Task } from '../task';
    • @Component({
    • selector: 'app-tasks',
    • templateUrl: './tasks.component.html',
    • styleUrls: ['./tasks.component.scss']
    • })
    • export class TasksComponent implements OnInit {
    • tasks: Task[];
    • constructor(private taskService: TaskService) { }
    • ngOnInit() {
    •  this.getTasks();
    • }
    • getTasks(): void {
    •  this.taskService.getTasks()
    •    .subscribe(tasks => this.tasks = tasks);
    • }
    • }
  7. Styling:
    • Define styles for your task components to ensure a user-friendly interface:
    • .task-container {
    • margin: auto;
    • width: 50%;
    • padding: 20px;
    • box-shadow: 0 4px 8px rgba(0,0,0,0.2);
    • }
    • .task-item {
    • display: flex;
    • justify-content: space-between;
    • padding: 10px;
    • margin-top: 10px;
    • border: 1px solid #ccc;
    • border-radius: 5px;
    • }
    • .task-title {
    • font-size: 18px;
    • }
    • .delete-button {
    • cursor: pointer;
    • color: red;
    • }

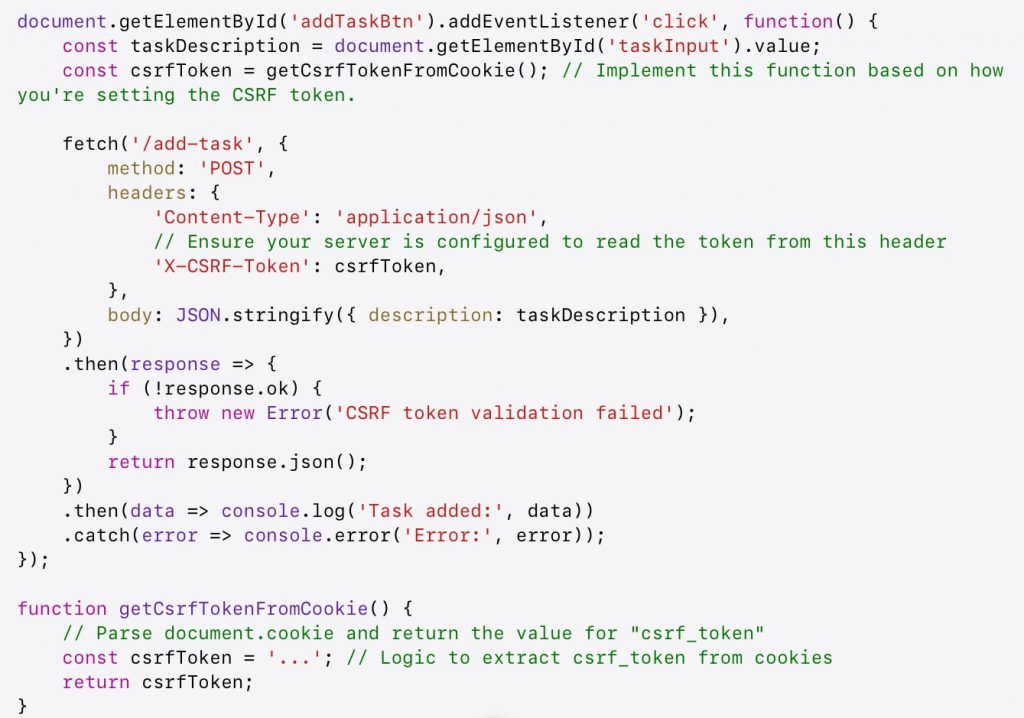
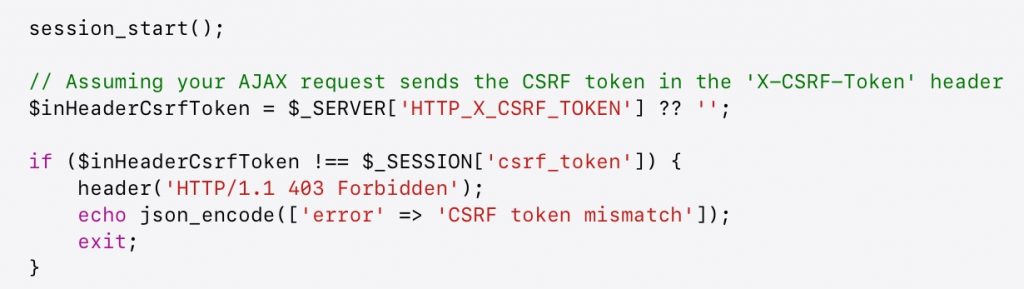
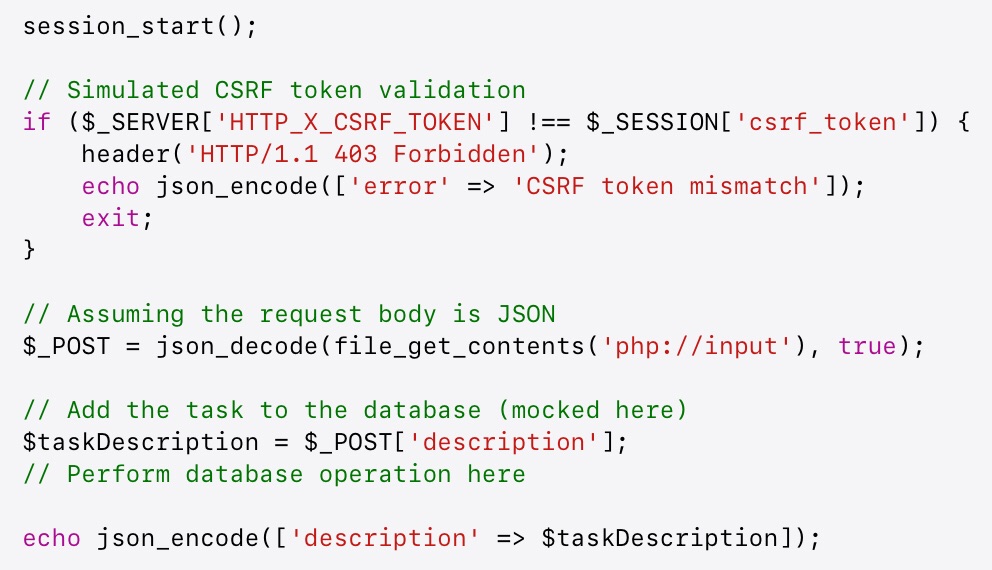
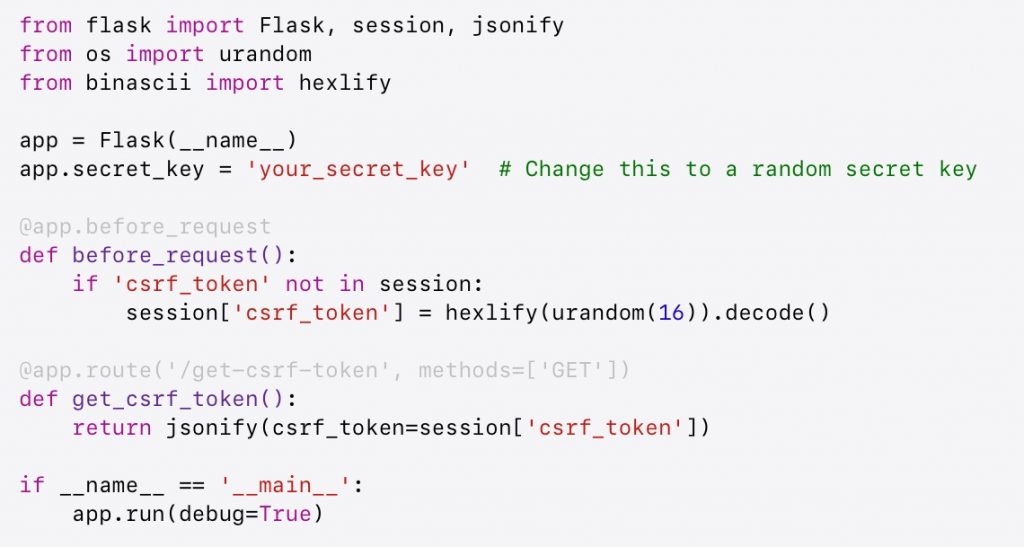
Setting Up Protection 🛡️

Securing your application is paramount, and Angular aids this with built-in CSRF protection. For back-end CSRF protection, use Node.js/Express with csurf and cookie-parser. Ensure Angular’s HttpClientModule is imported in your app.module.ts for front-end CSRF protection.

Building the Task Application’s UI 🎨

The UI of your task application is the face of your project. Angular provides directives like ngFor for listing tasks and ngModel for two-way data binding, significantly easing the development process.

Leveraging Angular Libraries and Frameworks 📚

To further enhance your application, Angular offers integration with various libraries and frameworks like Angular Material for UI components, NGRX for state management, and RxJS for handling asynchronous operations.

Conclusion

The journey through Angular development is filled with vast possibilities. Utilizing Angular CLI, incorporating essential components, and leveraging external libraries can significantly enrich your application, making “Task” a robust, dynamic, and user-friendly task management tool.

PHP, Python, and AJAX

In the development of web applications, particularly those requiring dynamic user interactions without reloading the page, AJAX (Asynchronous JavaScript and XML) plays a pivotal role.

📖 Backend Powerhouses

PHP and Python are two of the most popular server-side scripting languages, each with its unique strengths in web development. PHP is widely known for its ease of use and deep integration with HTML, making it a go-to for web developers looking to quickly deploy dynamic web applications. On the other hand, Python’s simplicity, readability, and the powerful Django and Flask frameworks make it a formidable choice for building robust web applications.

🛠 Database Management systems

When it comes to database operations, both PHP and Python offer extensive support for various database management systems (DBMS) that make interactions more secure, efficient, and less prone to SQL injection.

  • PHP’s PDO (PHP Data Objects)
  • Python’s ORM (Object-Relational Mapping) tools like Django’s

💻 Implementing

AJAX allows web applications to send and retrieve data from a server asynchronously, without interfering with the display and behavior of the existing page. By using AJAX, a Task Application can perform CRUD (Create, Read, Update, Delete) operations seamlessly.

This JavaScript function could interact with a PHP script that updates a task’s status in the database. Similarly, a Python backend using Flask or Django can be set up to handle such requests.

🎨 Semantic HTML and Bootstrap:

Semantic HTML tags like <header>, <footer>, <nav>, and <article> improve the structure and readability of web content, making it more accessible and SEO-friendly. In a Task Application, using these tags can help define the structure of the app, making it easier for users and search engines to understand the content.

Conclusion

Integrating PHP or Python with AJAX for database operations in a Task Application not only enhances functionality but also improves user experience by making the application more interactive and responsive.

Database Management

At its core, a database is a systematic collection of data that supports the storage, manipulation, and retrieval of information. Databases can be relational (SQL) or non-relational (NoSQL), each serving different needs based on the structure and scalability requirements of your application.

from Sololearn

Best Practices :

  • Data Sanitization : Always sanitize user inputs to prevent SQL injection attacks. This involves escaping potentially harmful characters before they’re processed by the database.
  • Privilege : Operate your database under the principle of least privilege, meaning users and applications should have only the minimum permissions necessary to perform their tasks.

Secure Requests and Authorization

HTTPS : Use HTTPS (Hypertext Transfer Protocol Secure) for all communications between the client and server. HTTPS encrypts data in transit, preventing attackers from intercepting sensitive information.

Authorization Tokens : Implement token-based authorization, such as JWT (JSON Web Tokens), to manage user sessions. Tokens should be securely stored (in HTTP-only cookies) and validated with each request to verify a user’s identity and permissions.

Click here to display content from YouTube.
Learn more in YouTube’s privacy policy.

Safeguarding Your Environment

Application and server configurations play a significant role in security. A misconfigured server or application can serve as an entry point for attackers.

Secure Configuration Practices:

  • Update Regularly: Keep your server software and dependencies up to date to protect against known vulnerabilities.
  • Minimal Exposure: Disable unnecessary services and features on your server to reduce potential attack surfaces.
  • Environment Variables: Store sensitive configuration options such as API keys and database credentials in environment variables, not in your codebase.

A Shield Against Cross-Site Request Forgery

Cross-Site Request Forgery (CSRF) is an attack that tricks the victim into submitting a malicious request. It exploits the trust that a site has in a user’s browser.

How CSRF Protection Works :

  1. Token Generation : The server generates a unique, unpredictable token and sends it to the client’s browser as part of a form or an AJAX request.
  2. Token Validation : When the client submits the form or makes a request, it must include this token. The server then validates the token before processing the request.
  3. Token Invalidation : Tokens are invalidated after being used or after a certain period, requiring new tokens for subsequent requests.

Implementing CSRF tokens in forms and AJAX requests is a standard practice in modern web frameworks. This mechanism ensures that every state-changing request originates from your application, not an attacker.

Without Ajax (simplified)

Conclusion : Keeping Data Secure

Remember, security isn’t a one-time task but a continuous process of learning, implementing, and evolving with the digital landscape.

What i need to know. Into a developer road map.

Continue with Python with more advanced topics such as object-oriented programming, data structures, algorithms, and asynchronous programming. Resources like Automate the Boring Stuff with Python and Python.org are excellent places to start.

Click here to display content from YouTube.
Learn more in YouTube’s privacy policy.

Step 1 : Python Skills

Step 2 : Front-End Technologies & librairies

Step 3: Back-End Development

Database Management: A full-stack developer must handle data efficiently. NOSQL (Mongo DB), SQL (SGBDR).

RESTful API Development: APIs are crucial for the communication between front-end and back-end.

Authentication & Security: Understand the importance of securing your applications against common security threats.

Step 4 : DevOps Practices

Version Control with Git: Mastering Git is essential for every developer. Learn how to manage your codebase using version control, collaborate with other developers, and use platforms like GitHub or GitLab.

Continuous Integration/Continuous Deployment (CI/CD): CI/CD pipelines to automate the testing and deployment of your applications. Tools like Jenkins, Travis CI, or GitHub Actions can help streamline these processes.

Step 5 : Building and Deploying a Full-Stack Application

Docker simplifies the complexities of the deployment process

Why Docker ?

  • Consistency and Isolation.
  • Microservices Architecture : Easily manage parts of an application independently.
  • Scalability.

Unit Testing

Unit testing is crucial for verifying the functionality of individual parts of an application. It helps in detecting early bugs and ensuring code quality.

  • unittest : Python’s built-in library unittest offers a way to automate testing for Python applications.
  • PHPUnit : PHPUnit is a programmer-oriented testing framework for PHP.

MySQL Workbench

MySQL Workbench is a unified visual tool for developers. It provides data modeling, SQL development, and comprehensive administration tools for server configuration, user administration, and much more.

Why MySQL Workbench ?

  • Simplify database design and maintenance.
  • Optimize database performance.
  • Manage your database server efficiently.

Web Hosting

Choosing the right web hosting service is crucial for the success of any web application. Always Data or back4app offer robust hosting solutions with support for Docker containers, making them an excellent choice for modern web applications.

Managing Databases with phpMyAdmin

phpMyAdmin is a free software tool written in PHP, intended to handle the administration of MySQL. It offers a convenient visual interface for database management, making tasks like creating databases, tables, and executing SQL statements easier.

Practical Scenario: Project Management System

Imagine developing a web-based project management system with features to manage projects and users. Here’s how the discussed tools come into play:

  • Development: Use Docker to containerize the application, ensuring it can be easily moved from development to production.
  • Testing: Implement unit tests in Python or PHP to ensure each functionality works as expected.
  • Database: Design your database schema using MySQL Workbench. The schema includes two main tables: projects and users.
    • Projects Table: Stores information about various projects.
    • Users Table: Contains user information, including roles that determine access levels within the system.
  • Deployment: Choose a web hosting service like Always Data or Back4app that supports Docker to deploy your application.
  • Database Management: Use phpMyAdmin for database administration tasks, such as managing user permissions and querying data.

Selection in Database: Example Scenario

To retrieve information about a specific project and its assigned users, you would execute a SQL query, possibly through phpMyAdmin. Here’s an example:

Conclusion

The ecosystem surrounding web application development, from Docker containers and unit testing to database management and web hosting, provides developers with a powerful toolkit for building, testing, and deploying robust applications.

Docker ! How to get started ?

Docker revolutionizes the way developers build, ship, and run applications by using containers. This technology ensures that applications work seamlessly in any environment by packaging them with all their dependencies.

What is Docker ?

Docker is a platform that enables you to create, deploy, and run applications in containers. Containers package an application with all its dependencies into a single unit, ensuring that it runs uniformly across any computing environment. This method significantly reduces the “it works on my machine” syndrome, promoting more reliable development and deployment processes.

Why Use Docker ?

1. Consistency: Docker ensures your application runs the same way in development, testing, and production environments, eliminating discrepancies across different stages of the software lifecycle.

2. Isolation: Containers are isolated from each other and the host system. If one application fails, it doesn’t affect others.

3. Efficiency: Docker enables more efficient use of system resources. Containers share the host system’s kernel and start up significantly faster than traditional virtual machines.

Getting Started with Docker

Installation:
Firstly, install Docker Desktop for Windows or Mac from the official Docker website, or Docker Engine for Linux distributions Docker Engine on Linux.

Building Your First Docker Container:

  1. Create a Dockerfile: This configuration file, named Dockerfile, outlines the steps to create the Docker image.

# Dockerfile for a Python-based application

FROM python:3.8 WORKDIR /app
COPY requirements.txt .
RUN pip install -r requirements.txt
COPY . .
CMD [“python”, “./app.py”]

  1. Build the Container: Execute the command to build your Docker image, substituting my-app with your app’s name.

docker build -t my-app .

  1. Run the Container: Launch your container, making the application available on a specified port.

docker run -p 4000:80 my-app

Docker Compose for Multi-Container Apps

For complex applications requiring multiple services: docker-compose.yml

Execute docker-compose up to start all services.

Use Case : Task App

Users can add, view, and complete tasks with stunning 3D visualizations for task categories using Three.js.

Backend : Choose between Python with Django for a dynamic, robust backend or PHP with Symfony for a modular, enterprise-level application.

  • Django Backend (views.py) :
  • Symfony Backend (TaskController.php) :

Frontend: Implement the UI with HTML, CSS for styling, and JavaScript for dynamic content loading. Three.js adds 3D visualizations.

  • HTML (index.html) :
  • CSS (style.css) :
  • JavaScript with Three.js (app.js) :

Unit Testing : Ensure functionality with unit tests for both backend choices.

  • Django Test :
  • Symfony Test :

Conclusion

Docker serves as a powerful tool in modern development environments, facilitating consistency across development, testing, and production stages. Our Task App showcases how Docker can be an instrument. To explore more about containerization : Docker’s comprehensive guide.

Laravel and Symfony in VS Code: Unit test, Extensions

Quel professeur vous a le plus influencé ? Pourquoi ?

The grand quest of web development with Laravel and Symfony requires not just skill and valor but also a good dose of humor to navigate the oft-treacherous paths of programming challenges.

Setting Up Your Forge

Before summoning the frameworks into your realm, ensure your toolkit is complete:

  • PHP: The ancient language spoken by servers.
  • Composer: The conduit for invoking PHP libraries.
  • VS Code: The arcane editor where your code come to life.

Laravel: Quickstart Magic

  1. With terminal, invoke Laravel:

composer global require laravel/installer

  1. Materialize your project with:

laravel new myEnchantedProject

  1. Use VS Code extensions like Laravel Artisan for spell-crafting and PHP Intelephense for heightened senses.
  2. With php artisan serve, behold at http://localhost:8000.

Symfony: The Architect’s Blueprint

  1. Call Symfony using Composer’s:

composer create-project symfony/website-skeleton myFortress

  1. The Symfony VSCode extension sharpens your blade.
  2. symfony server:start signals your project’s awakening to the world.

Let’s enhance our toolkit with some common VS Code extensions.

For Laravel

  • Laravel Artisan: Craft models, controllers, and migrations with simple incantations.
  • PHP Intelephense: Quick navigation, error detection, and auto-completion of spells.
  • Laravel Blade Snippets and Syntax Highlighting: Transform your Blade templates into a readable spellbook, making your views easier.
  • DotENV: (.env files) contain powerful secrets and configurations. This extension illuminates these files for easy reading and editing.

For Symfony

  • Symfony for VSCode: Offering route navigation, service container access, and more.
  • PHP Namespace Resolver: As you traverse the namespaces, this tool automatically discovers and resolves them, keeping your use statements organized.
  • Twig Language 2: A must-have for those who speak in Twig templates, adding syntax highlighting and snippets.

Universal Tools for PHP Developers

  • GitLens: Peer through the fabric of time and see the history of your code, understanding the when and why changes were made.
  • PHPUnit Test Explorer: Observe your PHPUnit tests directly from VS Code, making it easier to maintain the fortitude of your application.
  • Better Comments: Enchant your comments, making them more readable and meaningful with color-coded annotations.

Configuring Your Enchanted Editor

To wield these extensions effectively, venture into the mystical settings of VS Code by invoking the command palette (Ctrl+Shift+P or Cmd+Shift+P on Mac) and searching for “Extensions” as Extensions: Install Extensions. Here, in the search bar, scribe the name of the desired extension and press Enter. Installing them with a simple click.

Whether you’re crafting new spells in Laravel or fortifying the ramparts with Symfony, remember that the true power lies not in the tools themselves, but in the wisdom and creativity of the sorcerer who wields them.

Your quest is to create a feature allowing them to answer the profound query: “Quel professeur vous a le plus influencé ? Pourquoi ?”

Create a controller to manage the posts:

// The controller serves as the grand hall where requests are received and responses are summoned.

public function createEnchantingPost(Request $request) {

// The magic incantation that elicits a response to the age-old question.

$response = "M. Merlin, car il a transformé ma curiosité en passion pour la magie.";

return response()->json(['question' => $request->input('question'), 'response' => $response]);

}

Ensure your magic is potent by challenging it in the testing dungeons:

// This spell (test) verifies that our controller correctly conjures up responses.

public function testTheOracleSpeaksTruth() {

$this->json('POST', '/cast-spell', ['question' => 'Quel professeur vous a le plus influencé ? Pourquoi ?'])

->assertJson(['response' => "M. Merlin, car il a transformé ma curiosité en passion pour la magie."]);

}

Conclusion

Each framework, offers a path to crafting applications that can enchant users. Remember, development challenges are opportunities for growth, learning, and a bit of fun.

So, sharpen your blades, charge your spells, and prepare for the adventures that lie ahead.

🧭 Navigating through the process

Understanding the Task of iterating over arrays fetched from a SQL database

The goal is to iterate through an array of elements fetched from a SQL database, with each subsequent iteration covering fewer elements than the previous one.

Python Implementation

Python offers a straightforward syntax for handling database operations and iterating over arrays. Here’s how you can accomplish the task using Python:

PHP Implementation

PHP uses PDO for database interactions. Here’s how you can iterate through a fetched array with decreasing length:

JavaScript Implementation

In JavaScript, you might fetch data from a backend API and then process it. Here’s an example using fetch and async/await:

Unit Testing

Ensuring the reliability of your code through unit testing is essential. Here’s an example using Python’s unittest framework:

Conclusion

For junior developers, mastering array iteration and manipulation based on SQL data is a valuable skill across Python, PHP, and JavaScript. The ability to dynamically adjust the iteration based on the data set’s size introduces flexibility in data processing. Coupled with the practice of writing unit tests, this skill set ensures not only the functionality of your code but also its reliability and maintainability in the long term.

Symphony in the Real World

  • Choose Laravel if you prioritize rapid development, ease of use, and a rich set of out-of-the-box features for building web applications or APIs.
  • Opt for Symfony if you need a highly customizable, scalable framework that excels in performance for complex, enterprise-level applications.

Healthcare: Digital Health Solutions

Symfony in Healthcare: Symfony’s security, reliability, and scalability make it a prime choice for healthcare applications, where data sensitivity and uptime are paramount. Symfony’s Security Component plays a critical role in ensuring that applications meet stringent compliance standards, such as HIPAA in the US and GDPR in Europe.

Example Project: Although specific real-world examples like “MyHealthcare Clinic” are illustrative, Symfony’s ecosystem is replete with bundles and components that can be leveraged to build comprehensive healthcare platforms.

Media and Entertainment: Digital Experiences

Symfony for Media Platforms: Symfony’s robustness supports high-traffic media sites and streaming services, managing content delivery and user interactions effectively. The Symfony HttpKernel Component is key for handling requests and responses efficiently in such environments.

Real-World Application: Platforms like Dailymotion have utilized Symfony for various aspects of their application, showcasing Symfony’s capability to support high-demand media services.

E-Commerce: Online Business Success

Symfony in E-Commerce: Symfony excels in e-commerce due to its flexible structure and comprehensive security features. The Sylius platform, built on Symfony, exemplifies how Symfony can serve as the backbone for e-commerce solutions, offering scalability and customization.

Case Study: For an in-depth look at how Symfony powers e-commerce, the Sylius Case Studies page provides examples of businesses that have benefited from building on a Symfony-based platform.

Conclusion

Symfony’s extensive ecosystem, highlighted by its official documentation, showcases, and third-party platforms, underscores its adaptability and strength in building complex web applications across various industries.

By tapping into Symfony’s official website and exploring its showcases, developers can discover the framework’s potential and how it can be tailored to meet specific industry needs.

Reading and Resources

PHP Data Transfer with JSON

PHP, a server-side scripting language, is the unsung hero of many web applications. It works tirelessly behind the scenes, handling the crucial task of data transfer between the front end and the back end.

At its core, PHP excels in receiving data (from user inputs), processing it (applying business logic or database interactions), and sending responses back to the client.

Whether it’s processing form submissions, fetching data from a database, or sending JSON responses to a JavaScript front-end, PHP facilitates seamless communication within the application.

This cycle is fundamental to dynamic web applications, allowing them to respond to user actions in real-time.

Receiving Data

PHP receives data through global arrays such as $_GET, $_POST, and $_REQUEST. These arrays capture data sent from the front end, typically from HTML forms or AJAX requests.

  • $_GET: Contains data sent via URL parameters. Ideal for non-sensitive data and retrieving resources.
  • $_POST: Houses data sent as HTTP post requests. Perfect for form submissions with sensitive information.

// Example: Receiving data from a form submission

if ($_SERVER["REQUEST_METHOD"] == "POST") {

$name = htmlspecialchars($_POST['name']);

// Process $name

}

Processing Data: The Alchemy

Once data is received, PHP can interact with databases (MySQL), apply logic, and perform CRUD operations. This stage is where the back-end magic happens, transforming user inputs into meaningful actions or responses.

// Example: Inserting data into a MySQL database

$pdo = new

PDO('mysql:host=localhost;dbname=example_db', 'user', 'password'); $stmt = $pdo->prepare("INSERT INTO users (name) VALUES (:name)"); $stmt->execute(['name' => $name]);

Sending Responses

JSON, in particular, has become the lingua franca for front-end and back-end communication, especially in applications using AJAX or frameworks like React.

// Example: Sending a JSON response

header('Content-Type: application/json');

echo json_encode(['message' => 'Data processed successfully!']);

Simple PHP Script for Data Transfer

Imagine we’re building a part of “TaskWave” where users can add a new task. Here’s a simplified PHP script that showcases data receiving, processing, and sending a response:

<?php

// Assuming a form submission to this script if ($_SERVER["REQUEST_METHOD"] == "POST") "

{

$taskTitle = htmlspecialchars($_POST['taskTitle']);

// Database connection

$pdo = new

PDO('mysql:host=localhost;dbname=taskwave', 'username', 'password');

// Insert the new task into the database

$stmt = $pdo->prepare("INSERT INTO tasks (title) VALUES (:title)"); $stmt->execute(['title' => $taskTitle]);

// Return a success response

header('Content-Type: application/json');

echo json_encode(['message' => 'Task added successfully!']);

}

?>

This script is a microcosm of PHP’s role in data transfer within full-stack applications, demonstrating how data flows from the front end to the back end and back to the client.

Conclusion

Embarking on projects that involve these processes can immensely boost your confidence and skill set. So, to my fellow junior developers, I encourage you to creating, experimenting, and learning.

« Older posts Newer posts »

© 2024 Kvnbbg.fr

Theme by Anders NorénUp ↑

Verified by MonsterInsights